> ## Documentation Index
> Fetch the complete documentation index at: https://moengage-sdk-docs.mintlify.site/llms.txt
> Use this file to discover all available pages before exploring further.
# In-App NATIV
In-App NATIV Campaigns target your users by showing a message while the user is using your app. They are very effective in providing contextual information and help to cross-sell/up-sell on desired screens of your app or/and on desired actions performed by the user in your app.
 # SDK Installation
## Installing using BOM
Integration using BOM is the recommended way of integration; refer to the [Install Using BOM](/developer-guide/android-sdk/sdk-integration/basic-integration/Install-Using-BOM) document. Once you have configured the BOM add the dependency in the *app/build.gradle* file as shown below
```groovy build.gradle theme={"theme":{"light":"github-light","dark":"github-dark"}}
dependencies {
...
implementation("com.moengage:inapp")
}
```
Once the BOM is configured, include the specific MoEngage modules required for the application. \
Note: Version numbers are not required for these dependencies; the BOM automatically manages them.
### **Requirements for displaying images and GIFs in InApp**
Starting InApp version **7.0.0,** SDK requires [Glide](https://bumptech.github.io/glide/) to show images and GIFs in the in-apps. You need to add the below dependency in your **build.gradle** file.
```groovy Groovy theme={"theme":{"light":"github-light","dark":"github-dark"}}
dependencies {
...
implementation("com.github.bumptech.glide:glide:4.16.0")
}
```
# Display InApp
MoEngage can not show the InApp by default, and the app should call the following method in the places where necessary to show the InApps to the user. We recommend adding this method in onStart() of your activity or onResume() of your fragment. [MoEInAppHelper.getInstance().showInApp(context)](https://moengage.github.io/android-api-reference/inapp/com.moengage.inapp/-mo-e-in-app-helper/show-in-app.html)
```Kotlin Kotlin theme={"theme":{"light":"github-light","dark":"github-dark"}}
MoEInAppHelper.getInstance().showInApp(context)
```
# Display Nudges
Starting with version \*\*7.0.0,\*\*MoEngage InApp SDK supports displaying Non-Intrusive nudges.
MoEngage can not show the Nudges by default, and the app should call the following method in the places where necessary to show the Nudges to the user. We would recommend you add this method in onStart() of your activity or onResume() of your fragment. [MoEInAppHelper.getInstance().showNudge(context)](https://moengage.github.io/android-api-reference/inapp/com.moengage.inapp/-mo-e-in-app-helper/show-nudge.html)
```Kotlin Kotlin theme={"theme":{"light":"github-light","dark":"github-dark"}}
MoEInAppHelper.getInstance().showNudge(context)
```
# Handling Configuration change
Starting SDK version **11.4.00,** in-apps are supported in both portrait and landscape modes. SDK internally handles in-app display on orientation change when the activity restart is handled by the system.
In case your activity is handling the configuration change by itself, you have to notify the SDK by invoking [*MoEInAppHelper.getInstance().onConfigurationChanged()*](https://moengage.github.io/android-api-reference/inapp/com.moengage.inapp/-mo-e-in-app-helper/on-configuration-changed.html) API for SDK to redraw the in-app when the activity receives *onConfigurationChanged()* callback from the framework.
```kotlin Kotlin theme={"theme":{"light":"github-light","dark":"github-dark"}}
override fun onConfigurationChanged(newConfig: Configuration) {
super.onConfigurationChanged(newConfig)
MoEInAppHelper.getInstance().onConfigurationChanged()
}
```
```java Java theme={"theme":{"light":"github-light","dark":"github-dark"}}
@Override public void onConfigurationChanged(@NonNull Configuration newConfig) {
super.onConfigurationChanged(newConfig);
MoEInAppHelper.getInstance().onConfigurationChanged();
}
```
# Contextual InApp
You can restrict the in-apps based on the user's context in the application, apart from restricting InApp campaigns on a specific screen/activity. To set the user's context in the application, use [*setInAppContext()*](https://moengage.github.io/android-api-reference/inapp/com.moengage.inapp/-mo-e-in-app-helper/set-in-app-context.html) API, as shown below.
## Set Context
Call the below method in the *onStart()* of your *Activity* or *Fragment* before calling *showInApp().*
```kotlin Kotlin theme={"theme":{"light":"github-light","dark":"github-dark"}}
MoEInAppHelper.getInstance().setInAppContext(setOf("context1", "context2", "context3"))
```
```java Java theme={"theme":{"light":"github-light","dark":"github-dark"}}
Set inAppContext = new HashSet<>();
inAppContext.add("context1");
inAppContext.add("context2");
inAppContext.add("context3");
MoEInAppHelper.getInstance().setInAppContext(inAppContext);
```
The context is not the same context as [Android Context](https://developer.android.com/reference/android/content/Context?hl=en). This user's context in the application flow.
## Reset Context
Once the user is moving out of the context, use the [*restInAppContext()*](https://moengage.github.io/android-api-reference/inapp/com.moengage.inapp/-mo-e-in-app-helper/reset-in-app-context.html) API to reset/clear the existing context.
```kotlin Kotlin theme={"theme":{"light":"github-light","dark":"github-dark"}}
MoEInAppHelper.getInstance().resetInAppContext()
```
```java Java theme={"theme":{"light":"github-light","dark":"github-dark"}}
MoEInAppHelper.getInstance().resetInAppContext();
```
Code example below:
```kotlin Kotlin theme={"theme":{"light":"github-light","dark":"github-dark"}}
// Activity
class MyCustomActivity: Activity() {
override fun onStart() {
super.onStart()
MoEInAppHelper.getInstance().setInAppContext(setOf("context1", "context2"))
MoEInAppHelper.getInstance().showInApp(this)
}
override fun onStop() {
super.onStop()
MoEInAppHelper.getInstance().resetInAppContext()
}
}
// Fragment
class MyCustomFragment: Fragment() {
override fun onStart() {
super.onStart()
// Fragment's onStart code
// context1 and context2 can be changes as per screen/requirement
MoEInAppHelper.getInstance().setInAppContext(setOf("context1", "context2"))
MoEInAppHelper.getInstance().showInApp(this)
}
override fun onStop() {
super.onStop()
// Fragment's onStop code
MoEInAppHelper.getInstance().resetInAppContext()
}
}
```
```java Java theme={"theme":{"light":"github-light","dark":"github-dark"}}
// Activity
public class MyCustomActivity extends Activity {
@Override
protected void onStart() {
super.onStart();
// Activity's custom onStart logic here
Set inAppContext = new HashSet<>();
inAppContext.add("context1"); // Change the string name as per your requirement
inAppContext.add("context2"); // Change the string name as per your requirement
MoEInAppHelper.getInstance().setInAppContext(inAppContext);
MoEInAppHelper.getInstance().showInApp(this)
}
@Override
protected void onStop() {
super.onStop();
// Activity's custom onStop logic here
MoEInAppHelper.getInstance().resetInAppContext();
}
}
// Fragment
public class MyCustomFragment extends Fragment {
// Other Fragment code
@Override
public void onStart() {
super.onStart();
// Fragment's onStart code here
Set inAppContext = new HashSet<>();
inAppContext.add("context1");
inAppContext.add("context2");
MoEInAppHelper.getInstance().setInAppContext(inAppContext);
MoEInAppHelper.getInstance().showInApp(this)
}
@Override
public void onStop() {
super.onStop();
MoEInAppHelper.getInstance().resetInAppContext();
}
}
```
# WebView Customization
Starting with In-App SDK version **9.6.0**, the SDK supports customizing the underlying WebView used to render HTML In-App messages. This allows for modifying the WebView settings, adding custom JavaScript interfaces, and implementing other configurations to the WebView used to render HTML In-Apps.
To customize the WebView, you must invoke the `MoEInAppHelper.getInstance().setInAppWebViewCustomizer()` API. Any custom settings defined using this API will override the default MoEngage In-App WebView settings.
```kotlin Kotlin theme={"theme":{"light":"github-light","dark":"github-dark"}}
MoEInAppHelper.getInstance().setInAppWebViewCustomizer {
addJavascriptInterface(MyBridge(), "bridge")
settings.mediaPlaybackRequiresUserGesture = false
}
```
```java Java theme={"theme":{"light":"github-light","dark":"github-dark"}}
MoEInAppHelper.getInstance().setInAppWebViewCustomizer(
new kotlin.jvm.functions.Function1() {
@Override
public kotlin.Unit invoke(InAppWebView webView) {
WebSettings settings = webView.getSettings();
settings.setMediaPlaybackRequiresUserGesture(false);
webView.addJavascriptInterface(new CustomJavaScriptBridge(), "myBridge");
return kotlin.Unit.INSTANCE;
}
}
);
```
# Self-Handled InApps
Self-handled In-Apps are messages that the SDK delivers to the application, and the application builds the UI using the SDK's delivered payload.
## Single Self-Handled InApps
To get the self-handled in-app, use the below API.
```kotlin Kotlin theme={"theme":{"light":"github-light","dark":"github-dark"}}
MoEInAppHelper.getInstance().getSelfHandledInApp(context, listener)
```
```java Java theme={"theme":{"light":"github-light","dark":"github-dark"}}
MoEInAppHelper.getInstance().getSelfHandledInApp(context, listener);
```
The **listener** is an instance of [*SelfHandledAvailableListener.*](https://moengage.github.io/android-api-reference/inapp/com.moengage.inapp.listeners/-self-handled-available-listener/index.html)
This method should be called in the *onResume()* of your Fragment or *onStart()* of your activity.\
The above method is asynchronous and does not return the payload immediately, once the payload is available [*onSelfHandledAvailable(), the listener callback*](https://moengage.github.io/android-api-reference/inapp/com.moengage.inapp.listeners/-self-handled-available-listener/on-self-handled-available.html) would be called with the payload.
### Event-Triggered Self Handled InApps
To get a callback for an event triggered, implement *SelfHandledAvailableListener* and register for a listener using [*MoEInAppHelper.getInstance().setSelfHandledListener()*](https://moengage.github.io/android-api-reference/inapp/com.moengage.inapp/-mo-e-in-app-helper/set-self-handled-listener.html). SDK will notify the registered listener once the campaign is available.
We recommend registering this listener in the *onCreate()* of the *Application* class if the trigger event can happen on multiple screens.
## Multiple Self-Handled InApps
* This feature requires a minimum catalog version **4.5.0**
* Event-triggered multiple self-handled inapps are not supported.
Fetch Multiple Self Handled Campaigns using [*getSelfHandledInApps()*](https://moengage.github.io/android-api-reference/inapp/com.moengage.inapp/-mo-e-in-app-helper/index.html#1129437895%2FFunctions%2F434681417). The MoEngage SDK will return up to 5 campaigns(in the order of campaign priority set at the time of campaign creation) in the campaigns available callback method [*onCampaignsAvailable()*](https://moengage.github.io/android-api-reference/inapp/com.moengage.inapp.listeners/-self-handled-campaigns-available-listener/index.html#-1056690682%2FFunctions%2F434681417)**.**
```kotlin Kotlin theme={"theme":{"light":"github-light","dark":"github-dark"}}
MoEInAppHelper.getInstance().getSelfHandledInApps(context, listener)
```
```java Java theme={"theme":{"light":"github-light","dark":"github-dark"}}
MoEInAppHelper.getInstance().getSelfHandledInApps(context, listener);
```
The *listener* is an instance of [*SelfHandledCampaignsAvailableListener*](https://moengage.github.io/android-api-reference/inapp/com.moengage.inapp.listeners/-self-handled-campaigns-available-listener/index.html)[.](https://moengage.github.io/android-api-reference/inapp/com.moengage.inapp.listeners/-self-handled-available-listener/index.html)
This method should be called in the *onResume()* of your Fragment or *onStart()* of your activity.\
The above method is asynchronous and does not return the payload immediately, once the payload is available [*onCampaignsAvailable() callback*](https://moengage.github.io/android-api-reference/inapp/com.moengage.inapp.listeners/-self-handled-campaigns-available-listener/index.html#-1056690682%2FFunctions%2F434681417) of the listener would be called with the payload.
### Tracking Statistics for Multiple Self-Handled In-Apps
The *onCampaignsAvailable()* callback method returns [*SelfHandledCampaignsData*](https://moengage.github.io/android-api-reference/inapp/com.moengage.inapp.model/-self-handled-campaigns-data/index.html), which contains a list of [*SelfHandledCampaignData*](https://moengage.github.io/android-api-reference/inapp/com.moengage.inapp.model/-self-handled-campaign-data/index.html) objects. The statistics for each *SelfHandledCampaignData* object must be tracked individually below APIs.
### Fetching Contextual Multiple Self-Handled InApps
To fetch contextual multiple self-handled inapps, set the inapp contexts using [*setInAppContext()*](/developer-guide/android-sdk/in-app-messages/in-app-nativ#Set-Context) before calling \*[getSelfHandledInApps()](https://moengage.github.io/android-api-reference/inapp/com.moengage.inapp/-mo-e-in-app-helper/index.html#1129437895%2FFunctions%2F434681417).\*This will return a list of contextual and non-contextual inapps(in the order of campaign priority set at the time of campaign creation).
### Campaign Selection Logic
* **Default Limit**: By default, only 5 campaigns will be fetched.
* **Priority-Based Selection**: Campaigns are delivered based on their priority and last updated time. It checks for priority first and then checks the last updated time on conflicting priorities
* **Exclusion criteria**: Campaigns are only excluded based on specific rules like frequency capping, eligibility criteria, campaign status, or priority limits.
**Example Scenario:** If you have 6 campaigns with different priorities, published time and contexts:
* Context 1: Campaign 1 (P0, T2), Campaign 2 (P1, T3), Campaign 3 (P2, T6)
* Context 2: Campaign 4 (P0, T1), Campaign 5 (P1, T5)
* Context 3: Campaign 6 (P0, T4)
Following campaigns will be delivered in this order: \[Campaign 4, Campaign 1, Campaign 6, Campaign 2, Campaign 5]
**Selection Algorithm:**
1. Filter campaigns by user eligibility and targeting criteria
2. Sort by campaign priority (P0, P1, P2, etc.)
3. For campaigns with same priority, sort by most recent update timestamp
4. Return top 5 campaigns
#### **Best Practices for Campaign Organization for multiple self handled campaigns**
For optimal performance across multiple contexts on a single page, organize your campaigns like this:
* Context 1 (Homepage): Campaign A (P0), Campaign B (P1)
* Context 2 (Product): Campaign C (P0), Campaign D (P1)
* Context 3 (Checkout): Campaign E (P0)
This ensures each context has relevant campaigns without hitting the 5-campaign limit.
Also, make sure that you set the priority of the campaigns you want to fetch accordingly, because the method will fetch all self-handled campaigns regardless of whether they are context-based or not.
## Tracking Statistics for Self-Handled In-Apps
The application must notify MoEngage SDK whenever the In-App messages are displayed, clicked on, or dismissed, as the application controls these actions. The following methods are called to notify the SDK. The data object [*SelfHandledCampaignData*](https://moengage.github.io/android-api-reference/inapp/com.moengage.inapp.model/-self-handled-campaign-data/index.html) provided to the application in the callback for self-handled in-app should be passed as a parameter to the following APIs.
```kotlin Kotlin theme={"theme":{"light":"github-light","dark":"github-dark"}}
// call whenever in-app is shown
MoEInAppHelper.getInstance().selfHandledShown(context, data)
// call whenever in-app is clicked
MoEInAppHelper.getInstance().selfHandledClicked(context, data)
// call whenever in-app is dismissed
MoEInAppHelper.getInstance().selfHandledDismissed(context, data)
```
```java Java theme={"theme":{"light":"github-light","dark":"github-dark"}}
// call whenever in-app is shown
MoEInAppHelper.getInstance().selfHandledShown(context, data);
// call whenever in-app is clicked
MoEInAppHelper.getInstance().selfHandledClicked(context, data);
// call whenever in-app is dismissed
MoEInAppHelper.getInstance().selfHandledDismissed(context, data);
```
For more information, refer to the [API documentation](https://moengage.github.io/android-api-reference/inapp/com.moengage.inapp/-mo-e-in-app-helper/index.html#-59857046%2FFunctions%2F434681417).
# In-Apps Callback
## Lifecycle callback
To get callbacks whenever an InApp campaign is shown or dismissed, implement the [*InAppLifeCycleListener*](https://moengage.github.io/android-api-reference/inapp/com.moengage.inapp.listeners/-in-app-life-cycle-listener/index.html) and register for the callbacks using [*MoEInAppHelper.getInstance().addInAppLifeCycleListener()*](https://moengage.github.io/android-api-reference/inapp/com.moengage.inapp/-mo-e-in-app-helper/add-in-app-life-cycle-listener.html).
## Click Callback
To handle user navigation or custom action, SDK provides a callback whenever an in-app widget is clicked with either Navigation or Custom action. To get callbacks implement the [*OnClickActionListener*](https://moengage.github.io/android-api-reference/inapp/com.moengage.inapp.listeners/-on-click-action-listener/index.html) interface and register for the callbacks using [*MoEInAppHelper.getInstance().setClickActionListener()*](https://moengage.github.io/android-api-reference/inapp/com.moengage.inapp/-mo-e-in-app-helper/set-click-action-listener.html).
# Blocking InApps on Screens
Additionally, you can block in-app on a specific screen or handle the status bar visibility using the [InAppConfig](https://moengage.github.io/android-api-reference/core/com.moengage.core.config/\[android-jvm]-in-app-config/index.html) object and pass it to the SDK using the [MoEngage.Builder](https://moengage.github.io/android-api-reference/core/com.moengage.core/\[android-jvm]-mo-engage/-builder/index.html) object. Use the [configureInApps()](https://moengage.github.io/android-api-reference/core/com.moengage.core/\[android-jvm]-mo-engage/-builder/configure-in-apps.html) API to pass on the configuration to the SDK.
```kotlin Kotlin theme={"theme":{"light":"github-light","dark":"github-dark"}}
// List of activity classes on which in-app should not be shown
val inAppOptOut = mutableListOf()
inAppOptOut.add(SplashActivity::class.java.name)
val moengage = MoEngage.Builder(application, "XXXXXXXX")
.configureInApps(InAppConfig(inAppOptOut,true))
.build()
MoEngage.initialise(moengage)
```
```java Java theme={"theme":{"light":"github-light","dark":"github-dark"}}
ArrayList inAppOptOut = new ArrayList<>();
inAppOptOut.add(SplashActivity.class.getName());
MoEngage.Builder builder = new MoEngage.Builder(application, "XXXXXXXXXX")
.configureInApps(new InAppConfig(inAppOptOut,true));
MoEngage.initialise(builder.build());
```
# Testing In-App
Refer to this [link](https://help.moengage.com/hc/en-us/articles/360047789092-Testing-your-In-App-Nativ-Campaigns) to read more about how to create and test in-apps.
# Implementing Embedded Nudges (Deprecated)
Starting InApp version **7.0.0,** embedded nudges are no longer supported.
Nudges are non-disruptive messages which can be placed anywhere in the activity.
# SDK Installation
## Installing using BOM
Integration using BOM is the recommended way of integration; refer to the [Install Using BOM](/developer-guide/android-sdk/sdk-integration/basic-integration/Install-Using-BOM) document. Once you have configured the BOM add the dependency in the *app/build.gradle* file as shown below
```groovy build.gradle theme={"theme":{"light":"github-light","dark":"github-dark"}}
dependencies {
...
implementation("com.moengage:inapp")
}
```
Once the BOM is configured, include the specific MoEngage modules required for the application. \
Note: Version numbers are not required for these dependencies; the BOM automatically manages them.
### **Requirements for displaying images and GIFs in InApp**
Starting InApp version **7.0.0,** SDK requires [Glide](https://bumptech.github.io/glide/) to show images and GIFs in the in-apps. You need to add the below dependency in your **build.gradle** file.
```groovy Groovy theme={"theme":{"light":"github-light","dark":"github-dark"}}
dependencies {
...
implementation("com.github.bumptech.glide:glide:4.16.0")
}
```
# Display InApp
MoEngage can not show the InApp by default, and the app should call the following method in the places where necessary to show the InApps to the user. We recommend adding this method in onStart() of your activity or onResume() of your fragment. [MoEInAppHelper.getInstance().showInApp(context)](https://moengage.github.io/android-api-reference/inapp/com.moengage.inapp/-mo-e-in-app-helper/show-in-app.html)
```Kotlin Kotlin theme={"theme":{"light":"github-light","dark":"github-dark"}}
MoEInAppHelper.getInstance().showInApp(context)
```
# Display Nudges
Starting with version \*\*7.0.0,\*\*MoEngage InApp SDK supports displaying Non-Intrusive nudges.
MoEngage can not show the Nudges by default, and the app should call the following method in the places where necessary to show the Nudges to the user. We would recommend you add this method in onStart() of your activity or onResume() of your fragment. [MoEInAppHelper.getInstance().showNudge(context)](https://moengage.github.io/android-api-reference/inapp/com.moengage.inapp/-mo-e-in-app-helper/show-nudge.html)
```Kotlin Kotlin theme={"theme":{"light":"github-light","dark":"github-dark"}}
MoEInAppHelper.getInstance().showNudge(context)
```
# Handling Configuration change
Starting SDK version **11.4.00,** in-apps are supported in both portrait and landscape modes. SDK internally handles in-app display on orientation change when the activity restart is handled by the system.
In case your activity is handling the configuration change by itself, you have to notify the SDK by invoking [*MoEInAppHelper.getInstance().onConfigurationChanged()*](https://moengage.github.io/android-api-reference/inapp/com.moengage.inapp/-mo-e-in-app-helper/on-configuration-changed.html) API for SDK to redraw the in-app when the activity receives *onConfigurationChanged()* callback from the framework.
```kotlin Kotlin theme={"theme":{"light":"github-light","dark":"github-dark"}}
override fun onConfigurationChanged(newConfig: Configuration) {
super.onConfigurationChanged(newConfig)
MoEInAppHelper.getInstance().onConfigurationChanged()
}
```
```java Java theme={"theme":{"light":"github-light","dark":"github-dark"}}
@Override public void onConfigurationChanged(@NonNull Configuration newConfig) {
super.onConfigurationChanged(newConfig);
MoEInAppHelper.getInstance().onConfigurationChanged();
}
```
# Contextual InApp
You can restrict the in-apps based on the user's context in the application, apart from restricting InApp campaigns on a specific screen/activity. To set the user's context in the application, use [*setInAppContext()*](https://moengage.github.io/android-api-reference/inapp/com.moengage.inapp/-mo-e-in-app-helper/set-in-app-context.html) API, as shown below.
## Set Context
Call the below method in the *onStart()* of your *Activity* or *Fragment* before calling *showInApp().*
```kotlin Kotlin theme={"theme":{"light":"github-light","dark":"github-dark"}}
MoEInAppHelper.getInstance().setInAppContext(setOf("context1", "context2", "context3"))
```
```java Java theme={"theme":{"light":"github-light","dark":"github-dark"}}
Set inAppContext = new HashSet<>();
inAppContext.add("context1");
inAppContext.add("context2");
inAppContext.add("context3");
MoEInAppHelper.getInstance().setInAppContext(inAppContext);
```
The context is not the same context as [Android Context](https://developer.android.com/reference/android/content/Context?hl=en). This user's context in the application flow.
## Reset Context
Once the user is moving out of the context, use the [*restInAppContext()*](https://moengage.github.io/android-api-reference/inapp/com.moengage.inapp/-mo-e-in-app-helper/reset-in-app-context.html) API to reset/clear the existing context.
```kotlin Kotlin theme={"theme":{"light":"github-light","dark":"github-dark"}}
MoEInAppHelper.getInstance().resetInAppContext()
```
```java Java theme={"theme":{"light":"github-light","dark":"github-dark"}}
MoEInAppHelper.getInstance().resetInAppContext();
```
Code example below:
```kotlin Kotlin theme={"theme":{"light":"github-light","dark":"github-dark"}}
// Activity
class MyCustomActivity: Activity() {
override fun onStart() {
super.onStart()
MoEInAppHelper.getInstance().setInAppContext(setOf("context1", "context2"))
MoEInAppHelper.getInstance().showInApp(this)
}
override fun onStop() {
super.onStop()
MoEInAppHelper.getInstance().resetInAppContext()
}
}
// Fragment
class MyCustomFragment: Fragment() {
override fun onStart() {
super.onStart()
// Fragment's onStart code
// context1 and context2 can be changes as per screen/requirement
MoEInAppHelper.getInstance().setInAppContext(setOf("context1", "context2"))
MoEInAppHelper.getInstance().showInApp(this)
}
override fun onStop() {
super.onStop()
// Fragment's onStop code
MoEInAppHelper.getInstance().resetInAppContext()
}
}
```
```java Java theme={"theme":{"light":"github-light","dark":"github-dark"}}
// Activity
public class MyCustomActivity extends Activity {
@Override
protected void onStart() {
super.onStart();
// Activity's custom onStart logic here
Set inAppContext = new HashSet<>();
inAppContext.add("context1"); // Change the string name as per your requirement
inAppContext.add("context2"); // Change the string name as per your requirement
MoEInAppHelper.getInstance().setInAppContext(inAppContext);
MoEInAppHelper.getInstance().showInApp(this)
}
@Override
protected void onStop() {
super.onStop();
// Activity's custom onStop logic here
MoEInAppHelper.getInstance().resetInAppContext();
}
}
// Fragment
public class MyCustomFragment extends Fragment {
// Other Fragment code
@Override
public void onStart() {
super.onStart();
// Fragment's onStart code here
Set inAppContext = new HashSet<>();
inAppContext.add("context1");
inAppContext.add("context2");
MoEInAppHelper.getInstance().setInAppContext(inAppContext);
MoEInAppHelper.getInstance().showInApp(this)
}
@Override
public void onStop() {
super.onStop();
MoEInAppHelper.getInstance().resetInAppContext();
}
}
```
# WebView Customization
Starting with In-App SDK version **9.6.0**, the SDK supports customizing the underlying WebView used to render HTML In-App messages. This allows for modifying the WebView settings, adding custom JavaScript interfaces, and implementing other configurations to the WebView used to render HTML In-Apps.
To customize the WebView, you must invoke the `MoEInAppHelper.getInstance().setInAppWebViewCustomizer()` API. Any custom settings defined using this API will override the default MoEngage In-App WebView settings.
```kotlin Kotlin theme={"theme":{"light":"github-light","dark":"github-dark"}}
MoEInAppHelper.getInstance().setInAppWebViewCustomizer {
addJavascriptInterface(MyBridge(), "bridge")
settings.mediaPlaybackRequiresUserGesture = false
}
```
```java Java theme={"theme":{"light":"github-light","dark":"github-dark"}}
MoEInAppHelper.getInstance().setInAppWebViewCustomizer(
new kotlin.jvm.functions.Function1() {
@Override
public kotlin.Unit invoke(InAppWebView webView) {
WebSettings settings = webView.getSettings();
settings.setMediaPlaybackRequiresUserGesture(false);
webView.addJavascriptInterface(new CustomJavaScriptBridge(), "myBridge");
return kotlin.Unit.INSTANCE;
}
}
);
```
# Self-Handled InApps
Self-handled In-Apps are messages that the SDK delivers to the application, and the application builds the UI using the SDK's delivered payload.
## Single Self-Handled InApps
To get the self-handled in-app, use the below API.
```kotlin Kotlin theme={"theme":{"light":"github-light","dark":"github-dark"}}
MoEInAppHelper.getInstance().getSelfHandledInApp(context, listener)
```
```java Java theme={"theme":{"light":"github-light","dark":"github-dark"}}
MoEInAppHelper.getInstance().getSelfHandledInApp(context, listener);
```
The **listener** is an instance of [*SelfHandledAvailableListener.*](https://moengage.github.io/android-api-reference/inapp/com.moengage.inapp.listeners/-self-handled-available-listener/index.html)
This method should be called in the *onResume()* of your Fragment or *onStart()* of your activity.\
The above method is asynchronous and does not return the payload immediately, once the payload is available [*onSelfHandledAvailable(), the listener callback*](https://moengage.github.io/android-api-reference/inapp/com.moengage.inapp.listeners/-self-handled-available-listener/on-self-handled-available.html) would be called with the payload.
### Event-Triggered Self Handled InApps
To get a callback for an event triggered, implement *SelfHandledAvailableListener* and register for a listener using [*MoEInAppHelper.getInstance().setSelfHandledListener()*](https://moengage.github.io/android-api-reference/inapp/com.moengage.inapp/-mo-e-in-app-helper/set-self-handled-listener.html). SDK will notify the registered listener once the campaign is available.
We recommend registering this listener in the *onCreate()* of the *Application* class if the trigger event can happen on multiple screens.
## Multiple Self-Handled InApps
* This feature requires a minimum catalog version **4.5.0**
* Event-triggered multiple self-handled inapps are not supported.
Fetch Multiple Self Handled Campaigns using [*getSelfHandledInApps()*](https://moengage.github.io/android-api-reference/inapp/com.moengage.inapp/-mo-e-in-app-helper/index.html#1129437895%2FFunctions%2F434681417). The MoEngage SDK will return up to 5 campaigns(in the order of campaign priority set at the time of campaign creation) in the campaigns available callback method [*onCampaignsAvailable()*](https://moengage.github.io/android-api-reference/inapp/com.moengage.inapp.listeners/-self-handled-campaigns-available-listener/index.html#-1056690682%2FFunctions%2F434681417)**.**
```kotlin Kotlin theme={"theme":{"light":"github-light","dark":"github-dark"}}
MoEInAppHelper.getInstance().getSelfHandledInApps(context, listener)
```
```java Java theme={"theme":{"light":"github-light","dark":"github-dark"}}
MoEInAppHelper.getInstance().getSelfHandledInApps(context, listener);
```
The *listener* is an instance of [*SelfHandledCampaignsAvailableListener*](https://moengage.github.io/android-api-reference/inapp/com.moengage.inapp.listeners/-self-handled-campaigns-available-listener/index.html)[.](https://moengage.github.io/android-api-reference/inapp/com.moengage.inapp.listeners/-self-handled-available-listener/index.html)
This method should be called in the *onResume()* of your Fragment or *onStart()* of your activity.\
The above method is asynchronous and does not return the payload immediately, once the payload is available [*onCampaignsAvailable() callback*](https://moengage.github.io/android-api-reference/inapp/com.moengage.inapp.listeners/-self-handled-campaigns-available-listener/index.html#-1056690682%2FFunctions%2F434681417) of the listener would be called with the payload.
### Tracking Statistics for Multiple Self-Handled In-Apps
The *onCampaignsAvailable()* callback method returns [*SelfHandledCampaignsData*](https://moengage.github.io/android-api-reference/inapp/com.moengage.inapp.model/-self-handled-campaigns-data/index.html), which contains a list of [*SelfHandledCampaignData*](https://moengage.github.io/android-api-reference/inapp/com.moengage.inapp.model/-self-handled-campaign-data/index.html) objects. The statistics for each *SelfHandledCampaignData* object must be tracked individually below APIs.
### Fetching Contextual Multiple Self-Handled InApps
To fetch contextual multiple self-handled inapps, set the inapp contexts using [*setInAppContext()*](/developer-guide/android-sdk/in-app-messages/in-app-nativ#Set-Context) before calling \*[getSelfHandledInApps()](https://moengage.github.io/android-api-reference/inapp/com.moengage.inapp/-mo-e-in-app-helper/index.html#1129437895%2FFunctions%2F434681417).\*This will return a list of contextual and non-contextual inapps(in the order of campaign priority set at the time of campaign creation).
### Campaign Selection Logic
* **Default Limit**: By default, only 5 campaigns will be fetched.
* **Priority-Based Selection**: Campaigns are delivered based on their priority and last updated time. It checks for priority first and then checks the last updated time on conflicting priorities
* **Exclusion criteria**: Campaigns are only excluded based on specific rules like frequency capping, eligibility criteria, campaign status, or priority limits.
**Example Scenario:** If you have 6 campaigns with different priorities, published time and contexts:
* Context 1: Campaign 1 (P0, T2), Campaign 2 (P1, T3), Campaign 3 (P2, T6)
* Context 2: Campaign 4 (P0, T1), Campaign 5 (P1, T5)
* Context 3: Campaign 6 (P0, T4)
Following campaigns will be delivered in this order: \[Campaign 4, Campaign 1, Campaign 6, Campaign 2, Campaign 5]
**Selection Algorithm:**
1. Filter campaigns by user eligibility and targeting criteria
2. Sort by campaign priority (P0, P1, P2, etc.)
3. For campaigns with same priority, sort by most recent update timestamp
4. Return top 5 campaigns
#### **Best Practices for Campaign Organization for multiple self handled campaigns**
For optimal performance across multiple contexts on a single page, organize your campaigns like this:
* Context 1 (Homepage): Campaign A (P0), Campaign B (P1)
* Context 2 (Product): Campaign C (P0), Campaign D (P1)
* Context 3 (Checkout): Campaign E (P0)
This ensures each context has relevant campaigns without hitting the 5-campaign limit.
Also, make sure that you set the priority of the campaigns you want to fetch accordingly, because the method will fetch all self-handled campaigns regardless of whether they are context-based or not.
## Tracking Statistics for Self-Handled In-Apps
The application must notify MoEngage SDK whenever the In-App messages are displayed, clicked on, or dismissed, as the application controls these actions. The following methods are called to notify the SDK. The data object [*SelfHandledCampaignData*](https://moengage.github.io/android-api-reference/inapp/com.moengage.inapp.model/-self-handled-campaign-data/index.html) provided to the application in the callback for self-handled in-app should be passed as a parameter to the following APIs.
```kotlin Kotlin theme={"theme":{"light":"github-light","dark":"github-dark"}}
// call whenever in-app is shown
MoEInAppHelper.getInstance().selfHandledShown(context, data)
// call whenever in-app is clicked
MoEInAppHelper.getInstance().selfHandledClicked(context, data)
// call whenever in-app is dismissed
MoEInAppHelper.getInstance().selfHandledDismissed(context, data)
```
```java Java theme={"theme":{"light":"github-light","dark":"github-dark"}}
// call whenever in-app is shown
MoEInAppHelper.getInstance().selfHandledShown(context, data);
// call whenever in-app is clicked
MoEInAppHelper.getInstance().selfHandledClicked(context, data);
// call whenever in-app is dismissed
MoEInAppHelper.getInstance().selfHandledDismissed(context, data);
```
For more information, refer to the [API documentation](https://moengage.github.io/android-api-reference/inapp/com.moengage.inapp/-mo-e-in-app-helper/index.html#-59857046%2FFunctions%2F434681417).
# In-Apps Callback
## Lifecycle callback
To get callbacks whenever an InApp campaign is shown or dismissed, implement the [*InAppLifeCycleListener*](https://moengage.github.io/android-api-reference/inapp/com.moengage.inapp.listeners/-in-app-life-cycle-listener/index.html) and register for the callbacks using [*MoEInAppHelper.getInstance().addInAppLifeCycleListener()*](https://moengage.github.io/android-api-reference/inapp/com.moengage.inapp/-mo-e-in-app-helper/add-in-app-life-cycle-listener.html).
## Click Callback
To handle user navigation or custom action, SDK provides a callback whenever an in-app widget is clicked with either Navigation or Custom action. To get callbacks implement the [*OnClickActionListener*](https://moengage.github.io/android-api-reference/inapp/com.moengage.inapp.listeners/-on-click-action-listener/index.html) interface and register for the callbacks using [*MoEInAppHelper.getInstance().setClickActionListener()*](https://moengage.github.io/android-api-reference/inapp/com.moengage.inapp/-mo-e-in-app-helper/set-click-action-listener.html).
# Blocking InApps on Screens
Additionally, you can block in-app on a specific screen or handle the status bar visibility using the [InAppConfig](https://moengage.github.io/android-api-reference/core/com.moengage.core.config/\[android-jvm]-in-app-config/index.html) object and pass it to the SDK using the [MoEngage.Builder](https://moengage.github.io/android-api-reference/core/com.moengage.core/\[android-jvm]-mo-engage/-builder/index.html) object. Use the [configureInApps()](https://moengage.github.io/android-api-reference/core/com.moengage.core/\[android-jvm]-mo-engage/-builder/configure-in-apps.html) API to pass on the configuration to the SDK.
```kotlin Kotlin theme={"theme":{"light":"github-light","dark":"github-dark"}}
// List of activity classes on which in-app should not be shown
val inAppOptOut = mutableListOf()
inAppOptOut.add(SplashActivity::class.java.name)
val moengage = MoEngage.Builder(application, "XXXXXXXX")
.configureInApps(InAppConfig(inAppOptOut,true))
.build()
MoEngage.initialise(moengage)
```
```java Java theme={"theme":{"light":"github-light","dark":"github-dark"}}
ArrayList inAppOptOut = new ArrayList<>();
inAppOptOut.add(SplashActivity.class.getName());
MoEngage.Builder builder = new MoEngage.Builder(application, "XXXXXXXXXX")
.configureInApps(new InAppConfig(inAppOptOut,true));
MoEngage.initialise(builder.build());
```
# Testing In-App
Refer to this [link](https://help.moengage.com/hc/en-us/articles/360047789092-Testing-your-In-App-Nativ-Campaigns) to read more about how to create and test in-apps.
# Implementing Embedded Nudges (Deprecated)
Starting InApp version **7.0.0,** embedded nudges are no longer supported.
Nudges are non-disruptive messages which can be placed anywhere in the activity.
 Add the following code in the activity/fragment layout file.
```XML XML theme={"theme":{"light":"github-light","dark":"github-dark"}}
```
## Using in an Activity
Get an instance of the nudge view in the **onCreate()** and initialize the nudge view in the **onStart()** of the Activity.
## Using in a Fragment
Get an instance of the nudge view in the **onCreateView()** and initialize the nudge view in the **onResume()** of the fragment.
Use the below code to get the instance of the ***NudgeView*** and initialize it.
```kotlin Kotlin theme={"theme":{"light":"github-light","dark":"github-dark"}}
// get instance of the view
val nudge = findViewById(R.id.nudge)
// initialize
nudge.initialiseNudgeView(activity)
```
```java Java theme={"theme":{"light":"github-light","dark":"github-dark"}}
// get instance of the view
NudgeView nv = (NudgeView)findViewById(R.id.nudge);
// initialize
nv.initialiseNudgeView(getActivity());
```
# FAQs
* For In-App SDK version 9.6.0 and above, refer to the [WebView Customization](https://developers.moengage.com/hc/en-us/articles/4403652537492-In-App-NATIV#h_01KC43AKSVZHQDM57VMX0K35PF).
* If you are using In-App SDK version below 9.6.0, perform the following steps:
* Android's default WebView does not support file inputs. To enable this functionality, trigger a Custom Action from your HTML and handle it natively with an *OnClickActionListener*.\
Within the listener, launch your native file picker or camera logic. Ensure your app requests the required runtime permissions, such as CAMERA and READ\_EXTERNAL\_STORAGE.
Add the following code in the activity/fragment layout file.
```XML XML theme={"theme":{"light":"github-light","dark":"github-dark"}}
```
## Using in an Activity
Get an instance of the nudge view in the **onCreate()** and initialize the nudge view in the **onStart()** of the Activity.
## Using in a Fragment
Get an instance of the nudge view in the **onCreateView()** and initialize the nudge view in the **onResume()** of the fragment.
Use the below code to get the instance of the ***NudgeView*** and initialize it.
```kotlin Kotlin theme={"theme":{"light":"github-light","dark":"github-dark"}}
// get instance of the view
val nudge = findViewById(R.id.nudge)
// initialize
nudge.initialiseNudgeView(activity)
```
```java Java theme={"theme":{"light":"github-light","dark":"github-dark"}}
// get instance of the view
NudgeView nv = (NudgeView)findViewById(R.id.nudge);
// initialize
nv.initialiseNudgeView(getActivity());
```
# FAQs
* For In-App SDK version 9.6.0 and above, refer to the [WebView Customization](https://developers.moengage.com/hc/en-us/articles/4403652537492-In-App-NATIV#h_01KC43AKSVZHQDM57VMX0K35PF).
* If you are using In-App SDK version below 9.6.0, perform the following steps:
* Android's default WebView does not support file inputs. To enable this functionality, trigger a Custom Action from your HTML and handle it natively with an *OnClickActionListener*.\
Within the listener, launch your native file picker or camera logic. Ensure your app requests the required runtime permissions, such as CAMERA and READ\_EXTERNAL\_STORAGE.
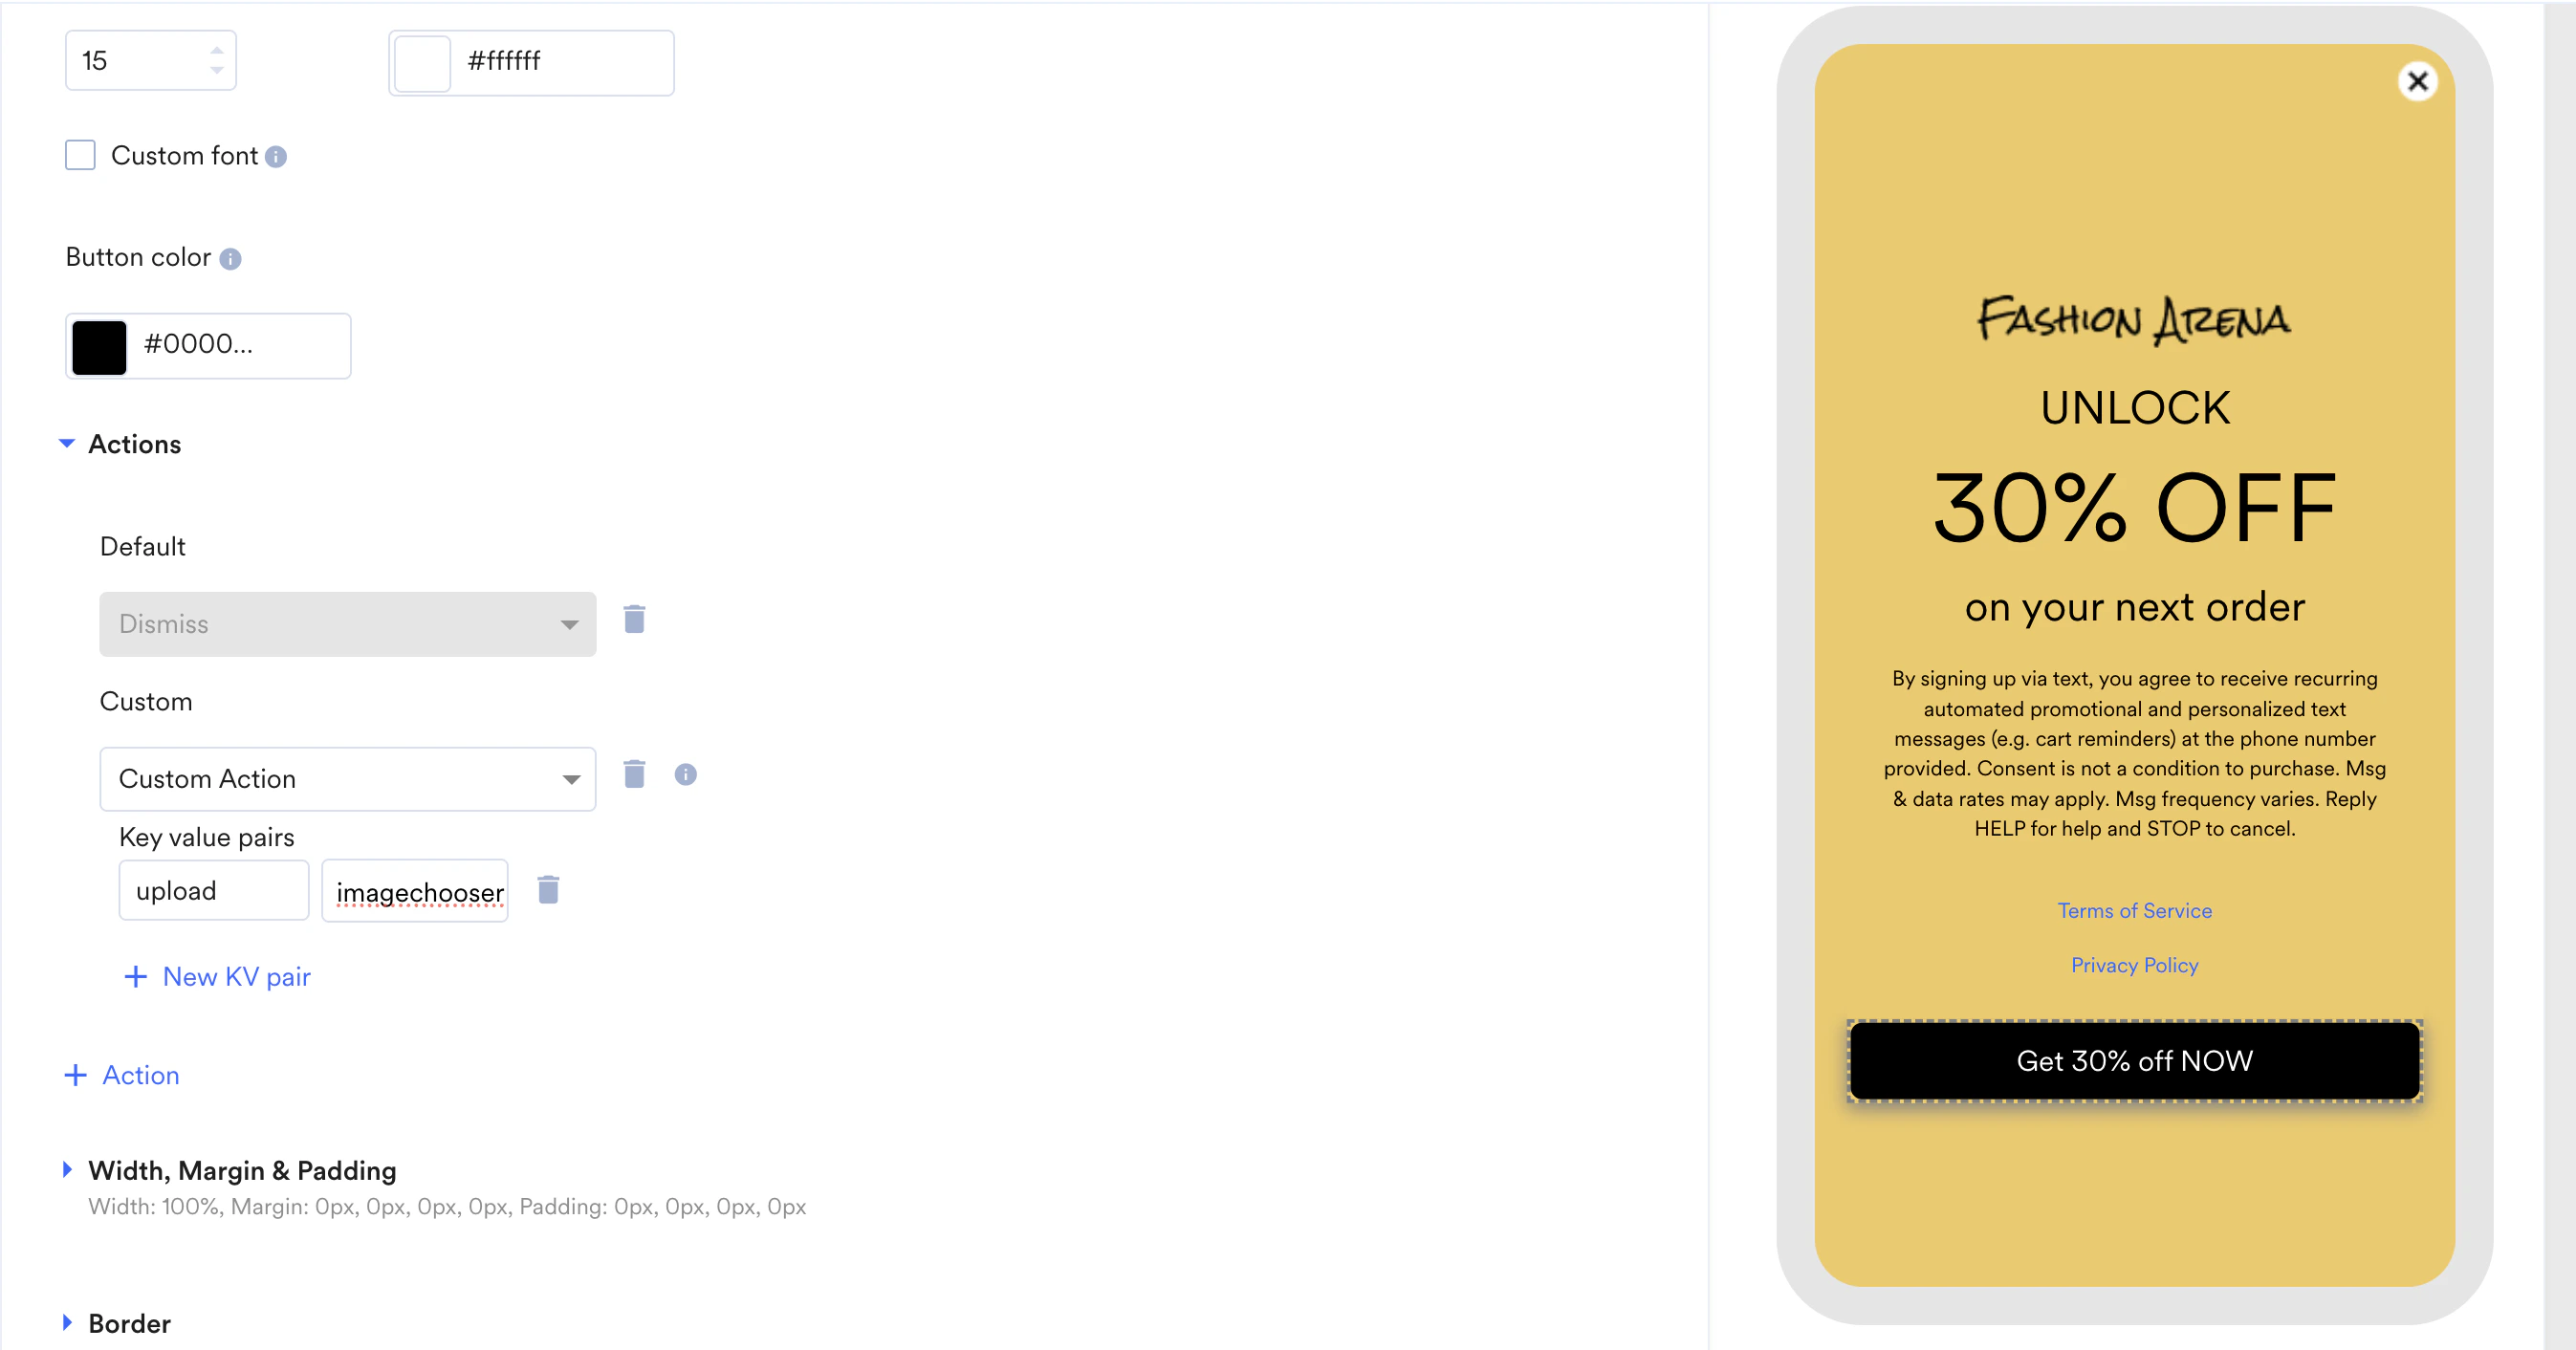 Example:
```kotlin Kotlin theme={"theme":{"light":"github-light","dark":"github-dark"}}
val listener = OnClickActionListener { clickData ->
if (clickData.action.actionType == ActionType.CUSTOM_ACTION &&
(clickData.action as CustomAction).keyValuePairs["action"] == "uploadPhoto")
{
openImageChooser() // Your native camera/gallery function
true // Indicates the action was handled
} else {
false
}
}
```
* For iOS, file inputs work by default. However, for a consistent cross-platform implementation, we recommend using the same Custom Action approach.
Example:
```kotlin Kotlin theme={"theme":{"light":"github-light","dark":"github-dark"}}
val listener = OnClickActionListener { clickData ->
if (clickData.action.actionType == ActionType.CUSTOM_ACTION &&
(clickData.action as CustomAction).keyValuePairs["action"] == "uploadPhoto")
{
openImageChooser() // Your native camera/gallery function
true // Indicates the action was handled
} else {
false
}
}
```
* For iOS, file inputs work by default. However, for a consistent cross-platform implementation, we recommend using the same Custom Action approach.