> ## Documentation Index
> Fetch the complete documentation index at: https://moengage-sdk-docs.mintlify.site/llms.txt
> Use this file to discover all available pages before exploring further.
# Shopify 2.0
# Overview
The Shopify and MoEngage integration allows you to seamlessly integrate MoEngage Web SDK to your brand's Shopify store to track user events and data. You can use channels such as Web Push, On-Site Messaging, SMS, Email, and Web Personalization to reach out to your store visitors to nudge them towards converting.
With this integration, you can enable real-time data sync, provide personalized recommendations, and increase conversions using cross-channel engagement.
You can also use Analytics to understand users' behavior on your Shopify Store and derive insights about them.
## Installing the MoEngage App on your Shopify store
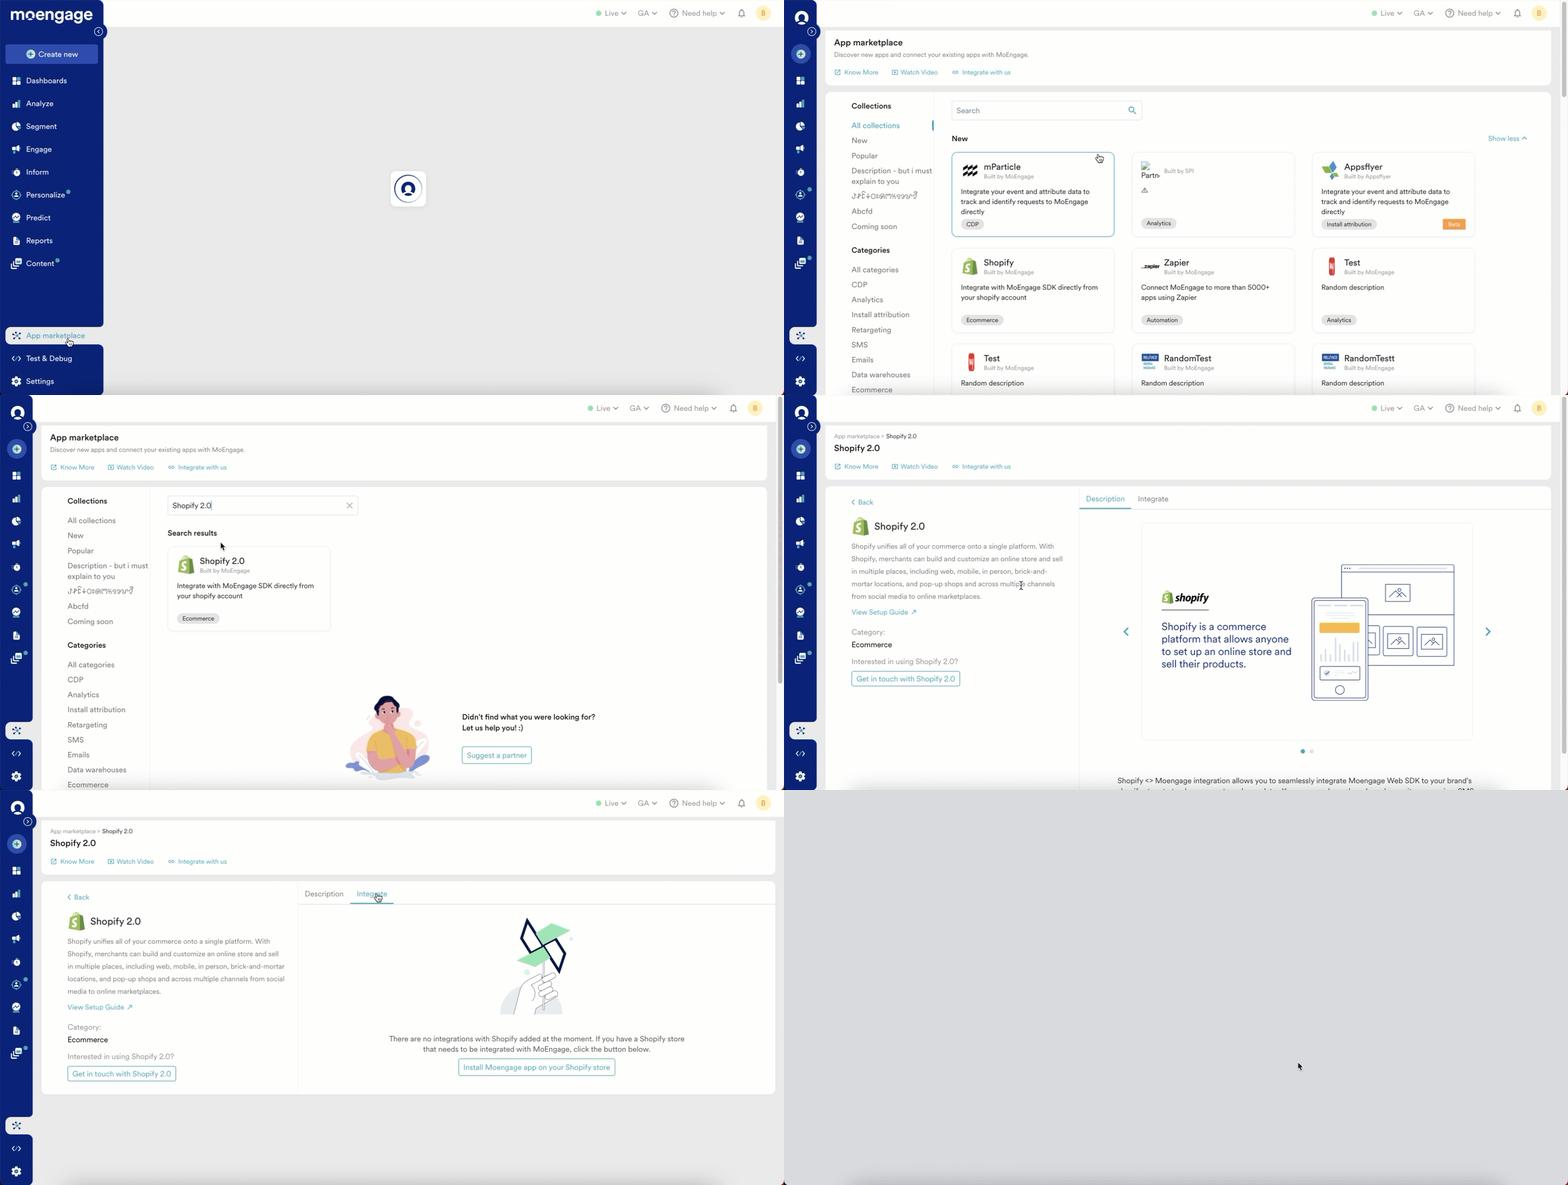
1. Navigate to the *App marketplace* on the MoEngage Dashboard.
2. Search for *Shopify 2.0* and click on the Shopify tile.
3. Navigate to the Integrate tab.
4. Click *Install MoEngage app on your Shopify store*.
 5. Click the *Install app* at the top left corner.
6. Enter the authentication parameters in the MoEngage app integration screen (MoEngage app ID and app key).
The Data API ID and Key are available at **Settings -> Account -> APIs**.
To fetch the app ID and app key, do the following:
1. If you do not have a MoEngage account, click *Sign up now*. You will be directed to the account creation page for MoEngage. Skip to step 3 if you have a MoEngage account already.
2. Fill out the form and submit the request for creating a MoEngage account. Once your MoEngage account has been created, you can fetch the authentication credentials described below.
3. Login to your MoEngage account.
4. From the dashboard, copy these values and paste them on your Shopify Installation page.
| **Field** | **Description** |
| :----------- | :------------------------------------------------------------------------------------------------------------------ |
| App ID | The Workspace ID of your MoEngage account is available at **Settings -> Account -> APIs ->** **Workspace ID**. |
| Data API ID | The Data API ID and the Workspace ID of your MoEngage account are the same. |
| Data API Key | The Data API key of your MoEngage account is available at **Settings -> App Settings -> APIs -> API Keys -> Data**. |
5. Click *Authenticate and Continue*. Once your authentication is successful, you can configure your app.
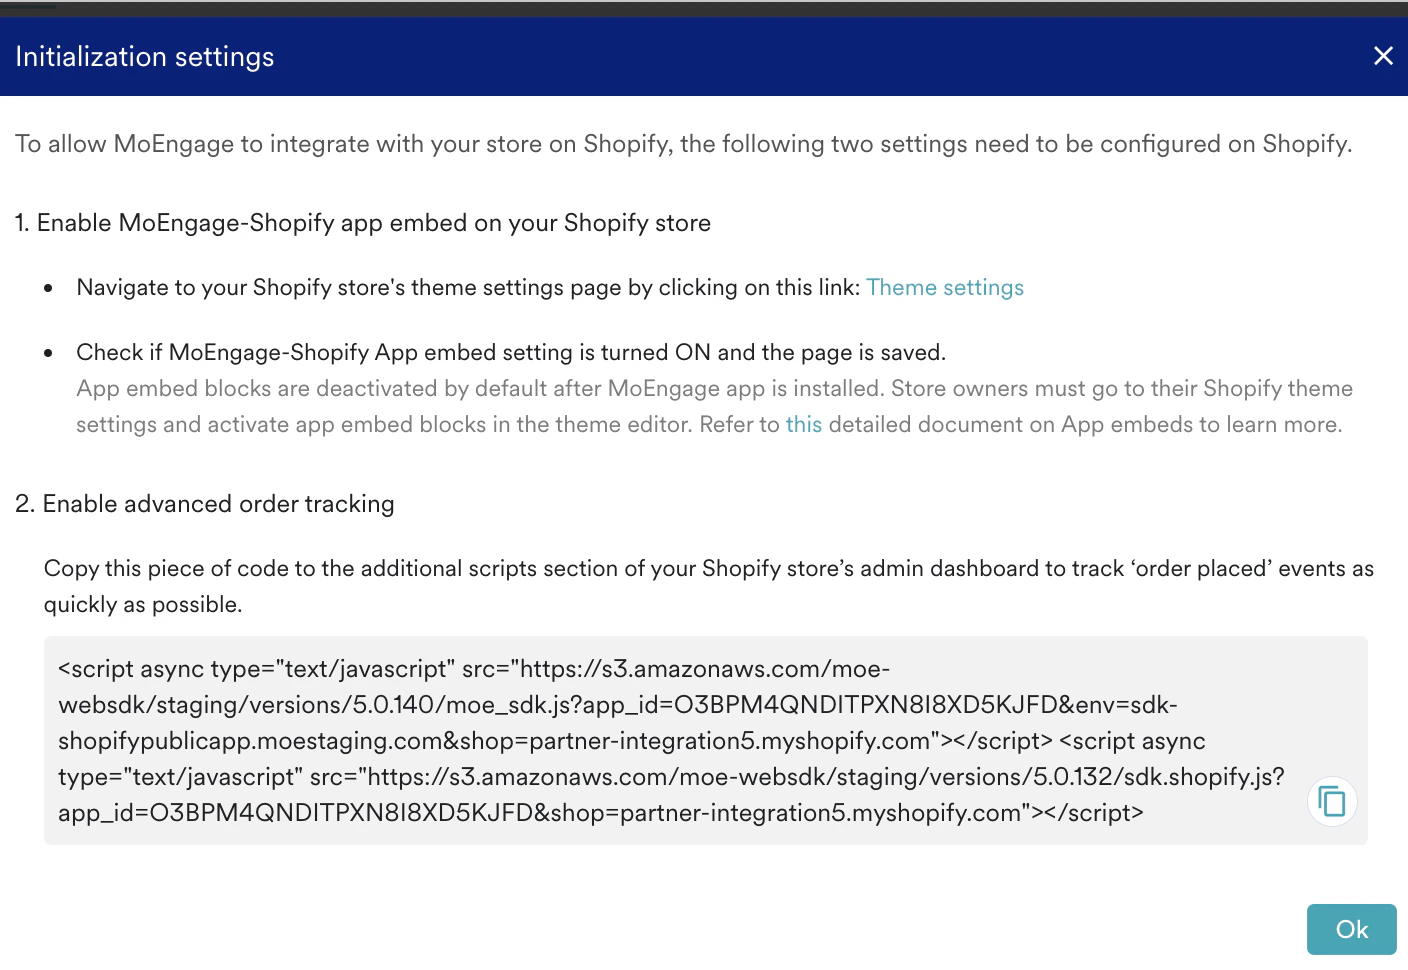
6. The Initialization Settings popup appears after you've successfully authenticated your app.
## Initialization Settings
The following steps must be performed for MoEngage to track user data and events.
The following settings must be configured on Shopify for successful integration:
1. Enable the MoEngage-Shopify app to embed on your Shopify Store. To do so:
1. Navigate to Theme Settings. (add link)
2. Turn on the *MoEngage Shopify app embed* setting.
3. Click *Save*.
2. Enable advanced order tracking - To track *Order Placed* events on MoEngage, copy the script shown in the Initialization Settings pop-up and paste it into the additional scripts section of the Shopify admin dashboard.
```ruby Code theme={"theme":{"light":"github-light","dark":"github-dark"}}
```
5. Click the *Install app* at the top left corner.
6. Enter the authentication parameters in the MoEngage app integration screen (MoEngage app ID and app key).
The Data API ID and Key are available at **Settings -> Account -> APIs**.
To fetch the app ID and app key, do the following:
1. If you do not have a MoEngage account, click *Sign up now*. You will be directed to the account creation page for MoEngage. Skip to step 3 if you have a MoEngage account already.
2. Fill out the form and submit the request for creating a MoEngage account. Once your MoEngage account has been created, you can fetch the authentication credentials described below.
3. Login to your MoEngage account.
4. From the dashboard, copy these values and paste them on your Shopify Installation page.
| **Field** | **Description** |
| :----------- | :------------------------------------------------------------------------------------------------------------------ |
| App ID | The Workspace ID of your MoEngage account is available at **Settings -> Account -> APIs ->** **Workspace ID**. |
| Data API ID | The Data API ID and the Workspace ID of your MoEngage account are the same. |
| Data API Key | The Data API key of your MoEngage account is available at **Settings -> App Settings -> APIs -> API Keys -> Data**. |
5. Click *Authenticate and Continue*. Once your authentication is successful, you can configure your app.
6. The Initialization Settings popup appears after you've successfully authenticated your app.
## Initialization Settings
The following steps must be performed for MoEngage to track user data and events.
The following settings must be configured on Shopify for successful integration:
1. Enable the MoEngage-Shopify app to embed on your Shopify Store. To do so:
1. Navigate to Theme Settings. (add link)
2. Turn on the *MoEngage Shopify app embed* setting.
3. Click *Save*.
2. Enable advanced order tracking - To track *Order Placed* events on MoEngage, copy the script shown in the Initialization Settings pop-up and paste it into the additional scripts section of the Shopify admin dashboard.
```ruby Code theme={"theme":{"light":"github-light","dark":"github-dark"}}
```
 ## Configuration Settings
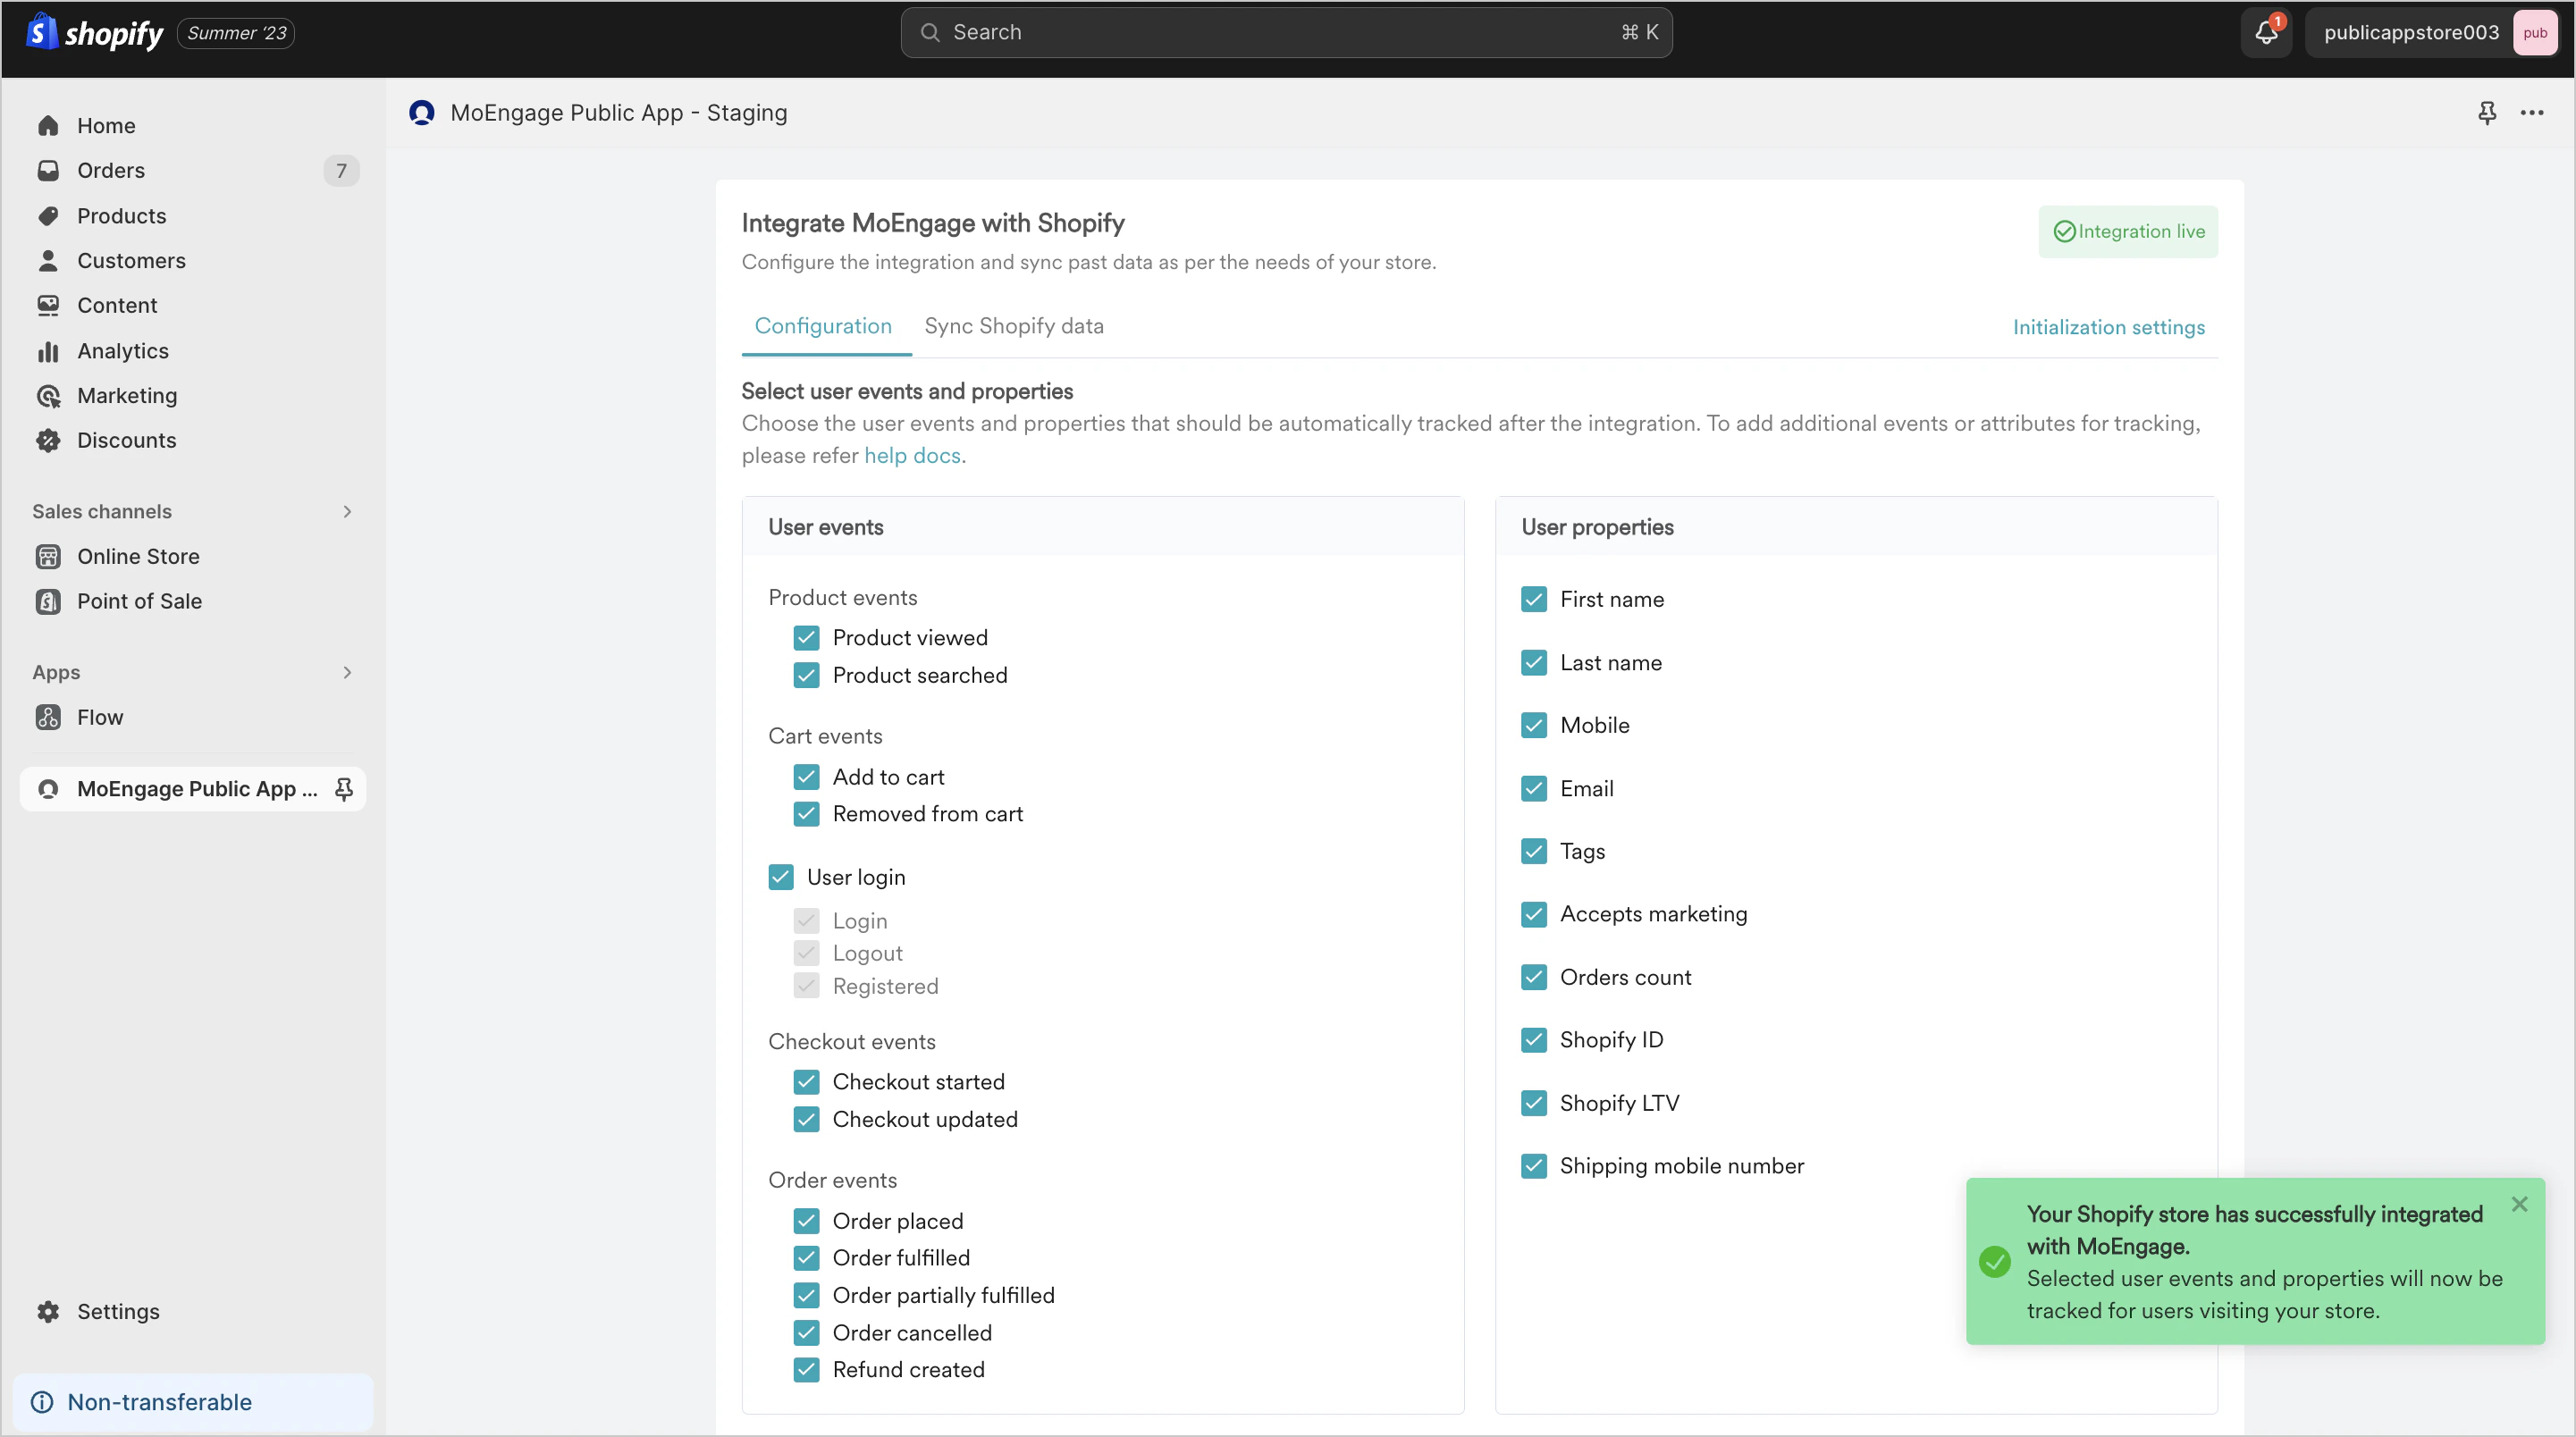
After successful initialization, navigate to the Configuration tab and do the following:
1. Select user events and properties that you want to track or be tracked. Note: MoEngage tracks some events by default. For more information about tracked default events, refer to [Event and Data Tracking](/developer-guide/ecommerce-platforms/shopify/events-and-user-data-tracking).To track custom events, refer to [Tracking Custom Events in MoEngage](/developer-guide/web-sdk/data-tracking/web-sdk-events-tracking).
2. Select the User Identifier (Email or Phone Number) in the *User Identifier for user synced* field. You can choose this identifier only once during integration.
3. To sync user data, navigate to the Data tab and follow the instructions in [User Data Sync](/developer-guide/ecommerce-platforms/shopify/user-data-sync).
4. Navigate to the *Configuration* tab and click *Save configuration*.
## Configuration Settings
After successful initialization, navigate to the Configuration tab and do the following:
1. Select user events and properties that you want to track or be tracked. Note: MoEngage tracks some events by default. For more information about tracked default events, refer to [Event and Data Tracking](/developer-guide/ecommerce-platforms/shopify/events-and-user-data-tracking).To track custom events, refer to [Tracking Custom Events in MoEngage](/developer-guide/web-sdk/data-tracking/web-sdk-events-tracking).
2. Select the User Identifier (Email or Phone Number) in the *User Identifier for user synced* field. You can choose this identifier only once during integration.
3. To sync user data, navigate to the Data tab and follow the instructions in [User Data Sync](/developer-guide/ecommerce-platforms/shopify/user-data-sync).
4. Navigate to the *Configuration* tab and click *Save configuration*.
 # Enable Web personalization
MoEngage's Web personalization helps you personalize the website experience for every visitor with limited or no involvement from tech teams. To use MoEngage's Web Personalization for your Shopify store:
1. Web Personalization should be enabled for your MoEngage account. If it is not enabled for your account, contact your CSM or [raise a support ticket](https://help.moengage.com/hc/en-us/articles/28298317432724-Raise-a-Support-Ticket-from-the-MoEngage-Login-Page).
2. Turn on the *Enable web personalization on your store* toggle.
# Enable Web personalization
MoEngage's Web personalization helps you personalize the website experience for every visitor with limited or no involvement from tech teams. To use MoEngage's Web Personalization for your Shopify store:
1. Web Personalization should be enabled for your MoEngage account. If it is not enabled for your account, contact your CSM or [raise a support ticket](https://help.moengage.com/hc/en-us/articles/28298317432724-Raise-a-Support-Ticket-from-the-MoEngage-Login-Page).
2. Turn on the *Enable web personalization on your store* toggle.
 # Next Steps
Now that your integration is successful, you can sync data about your past orders and start tracking events.
1. [Events and User Data Tracking](/developer-guide/ecommerce-platforms/shopify/events-and-user-data-tracking)
2. [Sync User Data](/developer-guide/ecommerce-platforms/shopify/user-data-sync)
3. [Steps to Validate Integration](/developer-guide/ecommerce-platforms/shopify/validate-integration)
4. [FAQ](/developer-guide/ecommerce-platforms/shopify/faqs)
# Next Steps
Now that your integration is successful, you can sync data about your past orders and start tracking events.
1. [Events and User Data Tracking](/developer-guide/ecommerce-platforms/shopify/events-and-user-data-tracking)
2. [Sync User Data](/developer-guide/ecommerce-platforms/shopify/user-data-sync)
3. [Steps to Validate Integration](/developer-guide/ecommerce-platforms/shopify/validate-integration)
4. [FAQ](/developer-guide/ecommerce-platforms/shopify/faqs)