> ## Documentation Index
> Fetch the complete documentation index at: https://moengage-sdk-docs.mintlify.site/llms.txt
> Use this file to discover all available pages before exploring further.
# APNS Certificate/PEM file (legacy)
**Note**
Effective January 15, 2026, MoEngage will deprecate the legacy APNs Provider Certificate (.pem) method. After this date, existing certificates cannot be renewed, and all new uploads must use the [APNs Authentication Key (.p8)](/developer-guide/ios-sdk/push/basic/apns-authentication-key).
MoEngage strongly recommends migrating to the .p8 Auth Key as soon as possible to ensure uninterrupted service. This upgrade offers the following benefits:
* **Permanent validity**: Auth Keys never expire, eliminating the need for annual certificate renewals.
* **Faster delivery**: Stateless token-based authentication provides faster communication than certificate-based methods.
* **Modern feature support:** The new standard supports exclusive iOS capabilities, such as Live Activities.
In order to send push notifications to your app, an APNS certificate is needed for your app, and the same has to be converted to a `.pem` format and uploaded to our dashboard. Follow the steps below to do the same:
# Creating APNS Certificate
## Generating the Certificate Signing Request (CSR)
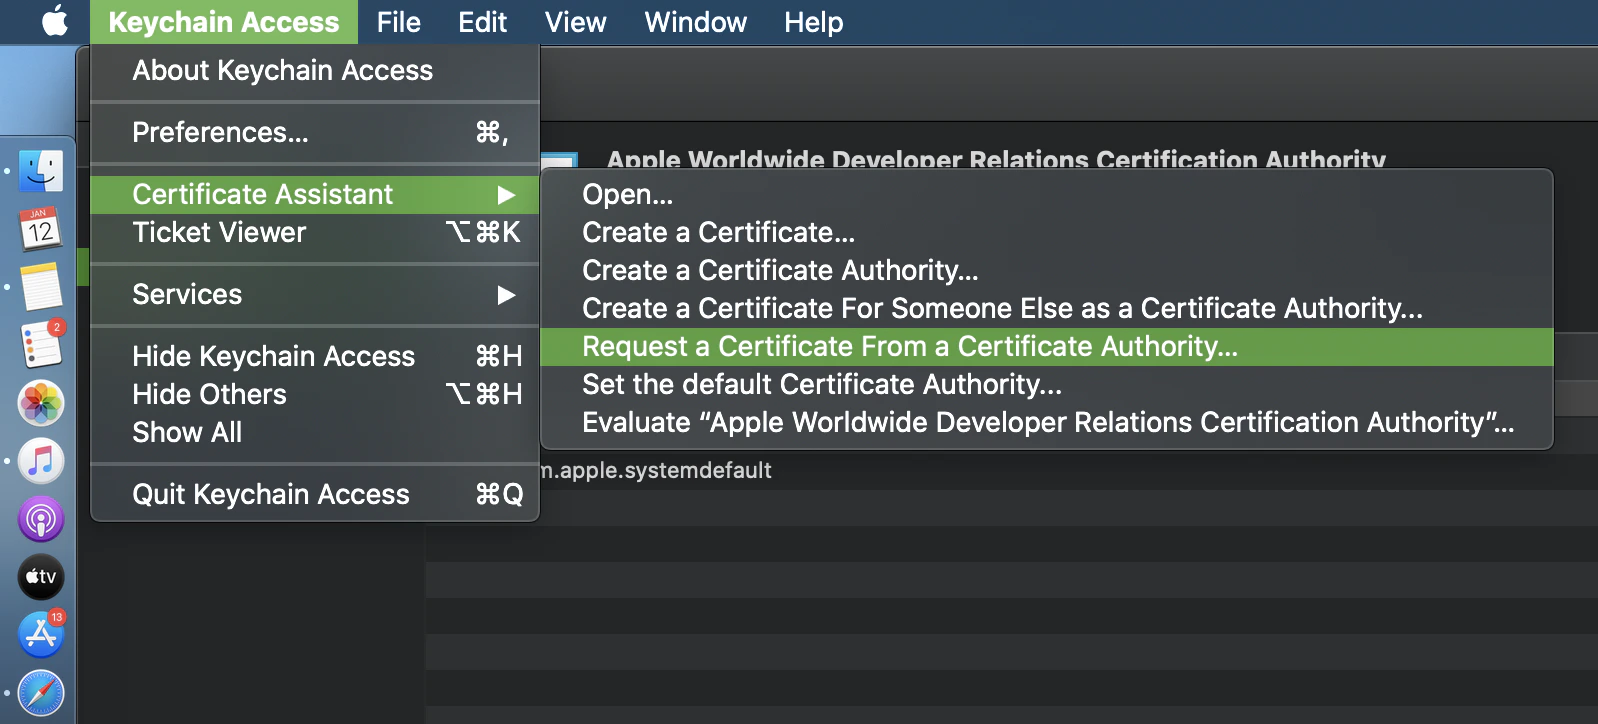
First Open **Keychain Access** on your Mac and choose the menu option **Request a Certificate from a Certificate Authority** as shown below:
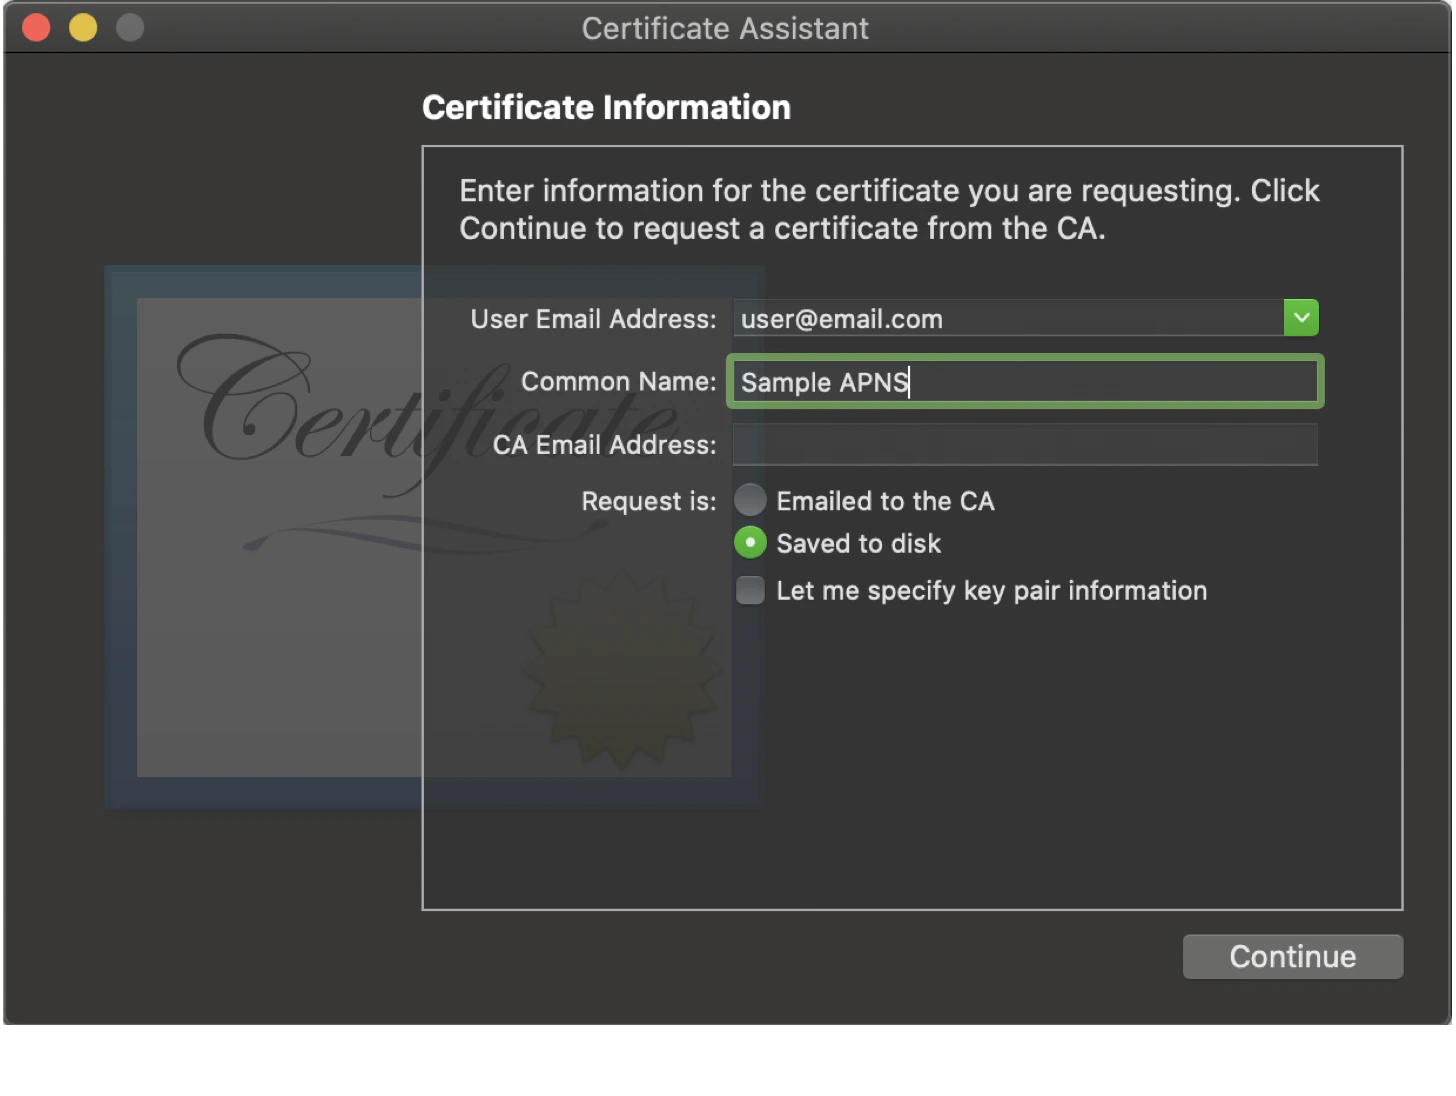
 You should now see the window shown below. Enter your email address here and your app name for Common Name. Check `Saved to disk` and click Continue. Save the file as “.certSigningRequest”:
 ## Create an APNS Certificate in Developer Account
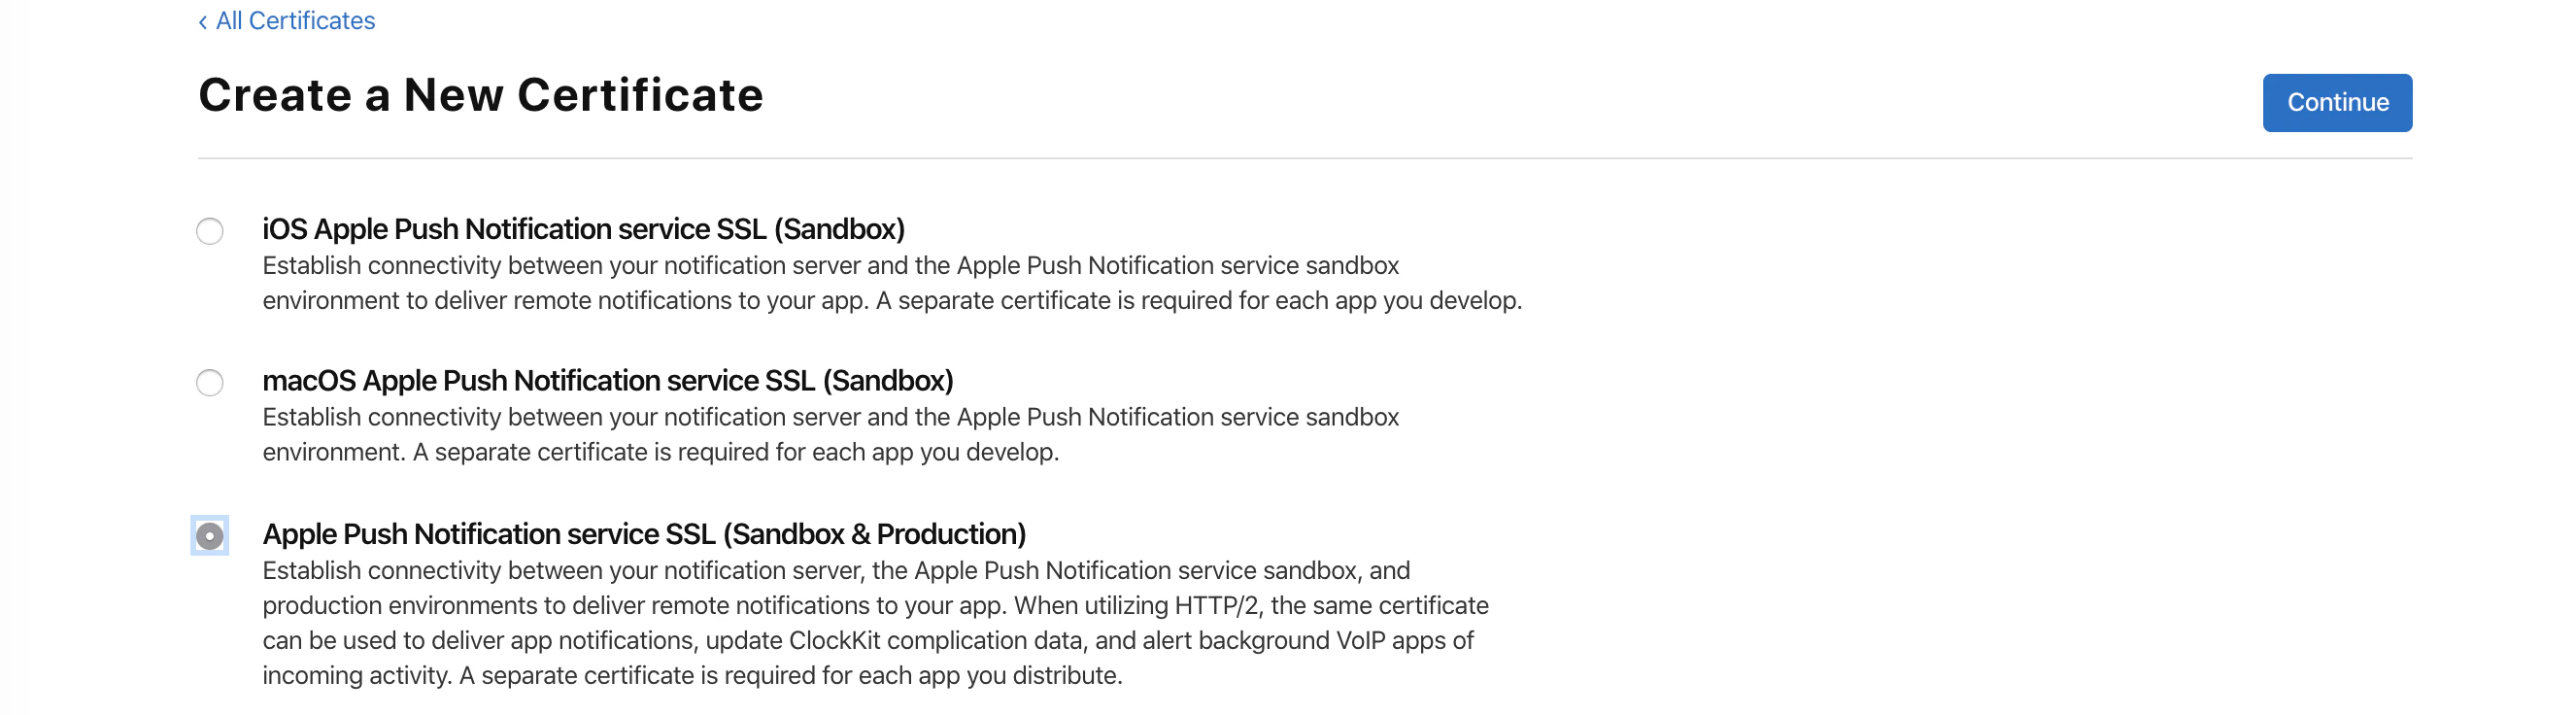
Log-in to your developer account and go to **Certificates, Identifiers and Profiles**. Select **Certificates** Section and click on the *+* icon to create a new certificate. In **Create a New Certificate** screen select `Apple Push Notification service SSL(Sandbox & Production)` and click Continue as shown below:
## Create an APNS Certificate in Developer Account
Log-in to your developer account and go to **Certificates, Identifiers and Profiles**. Select **Certificates** Section and click on the *+* icon to create a new certificate. In **Create a New Certificate** screen select `Apple Push Notification service SSL(Sandbox & Production)` and click Continue as shown below:
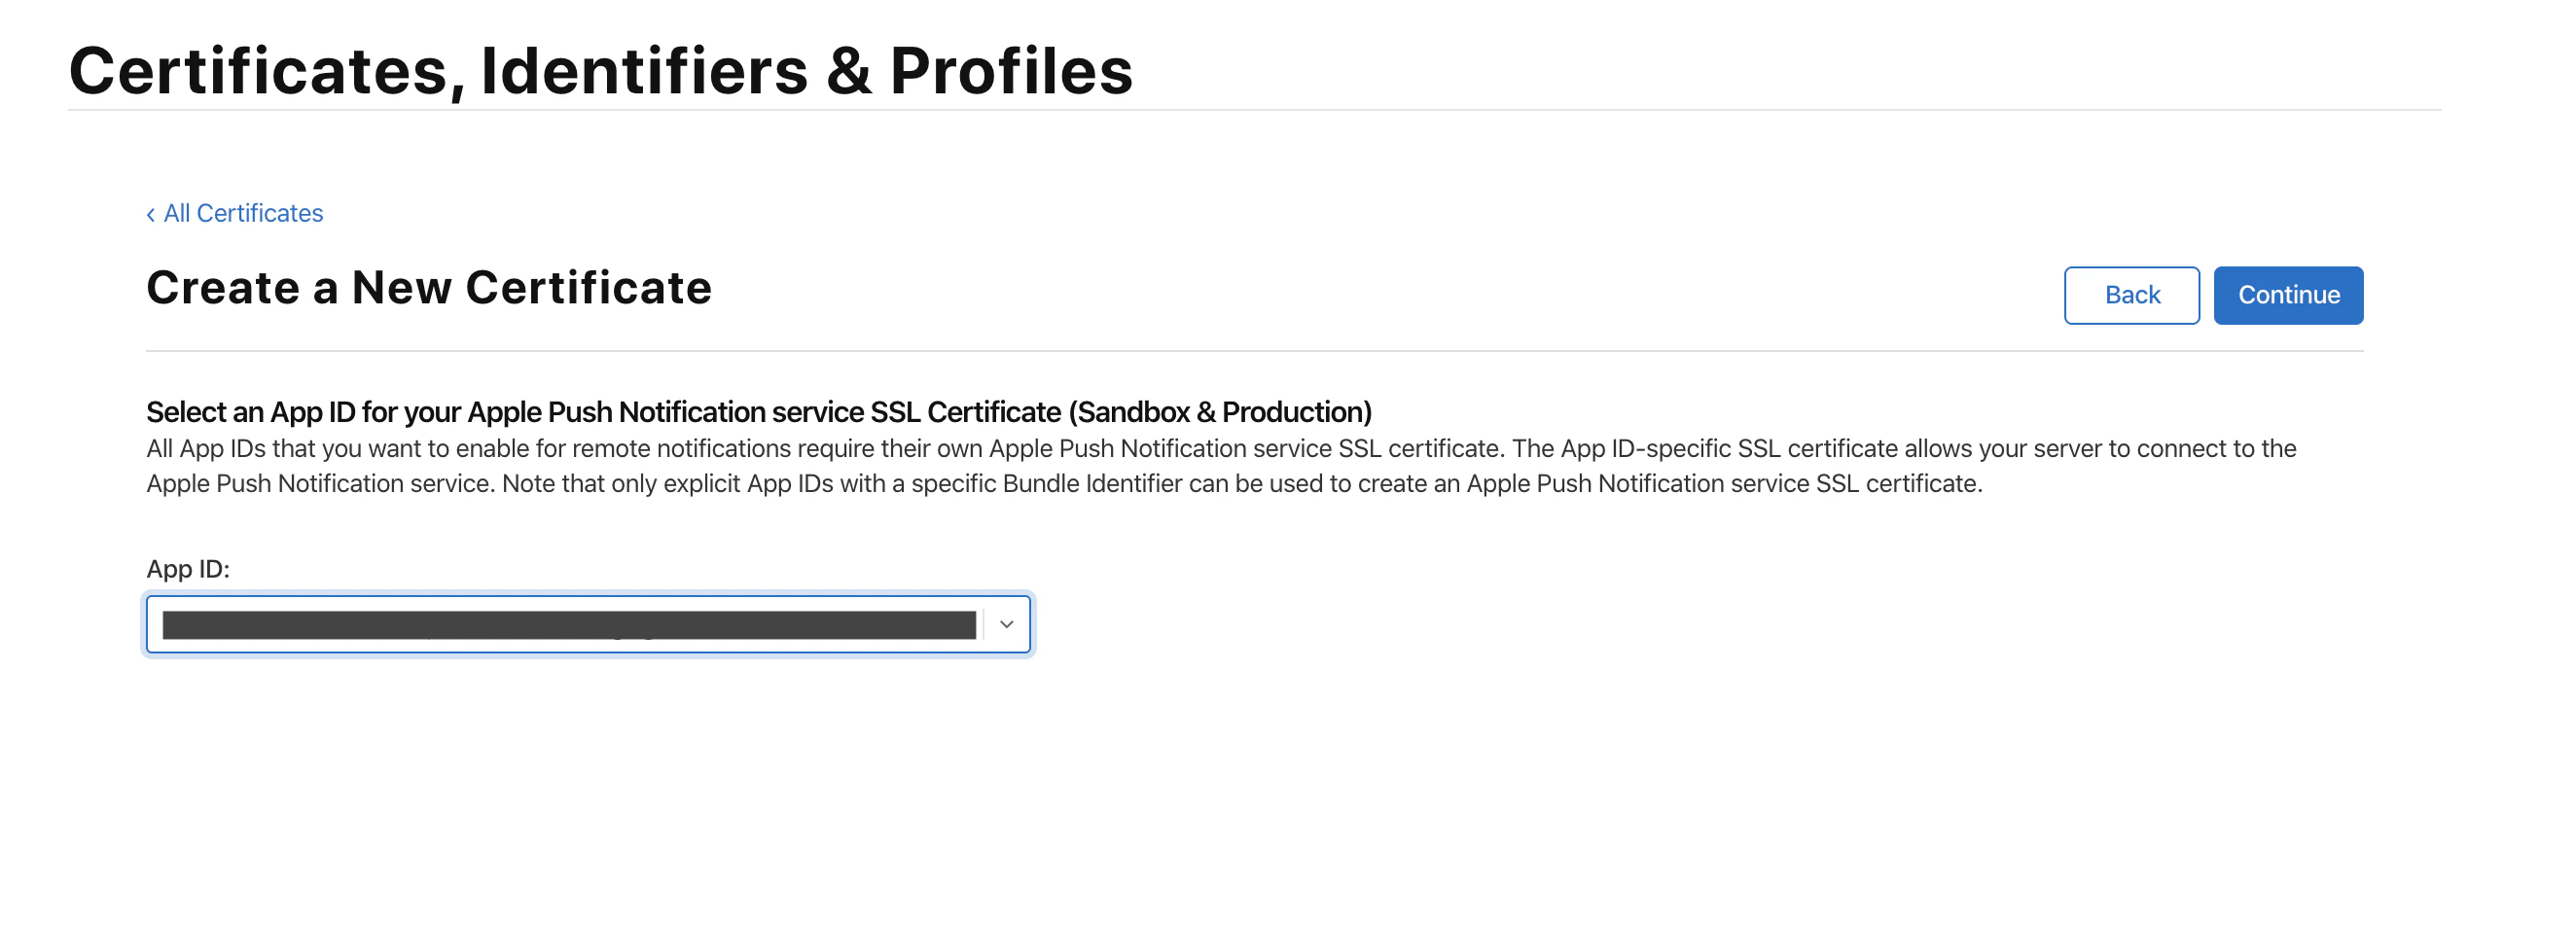
 Next, select the App ID(App Bundle ID) for which you are creating the APNS certificate and click Continue
 **APP ID Selection Note**
Ensure **Push Notification** capability is enabled for the App(App ID selected) you are creating an APNS certificate for.
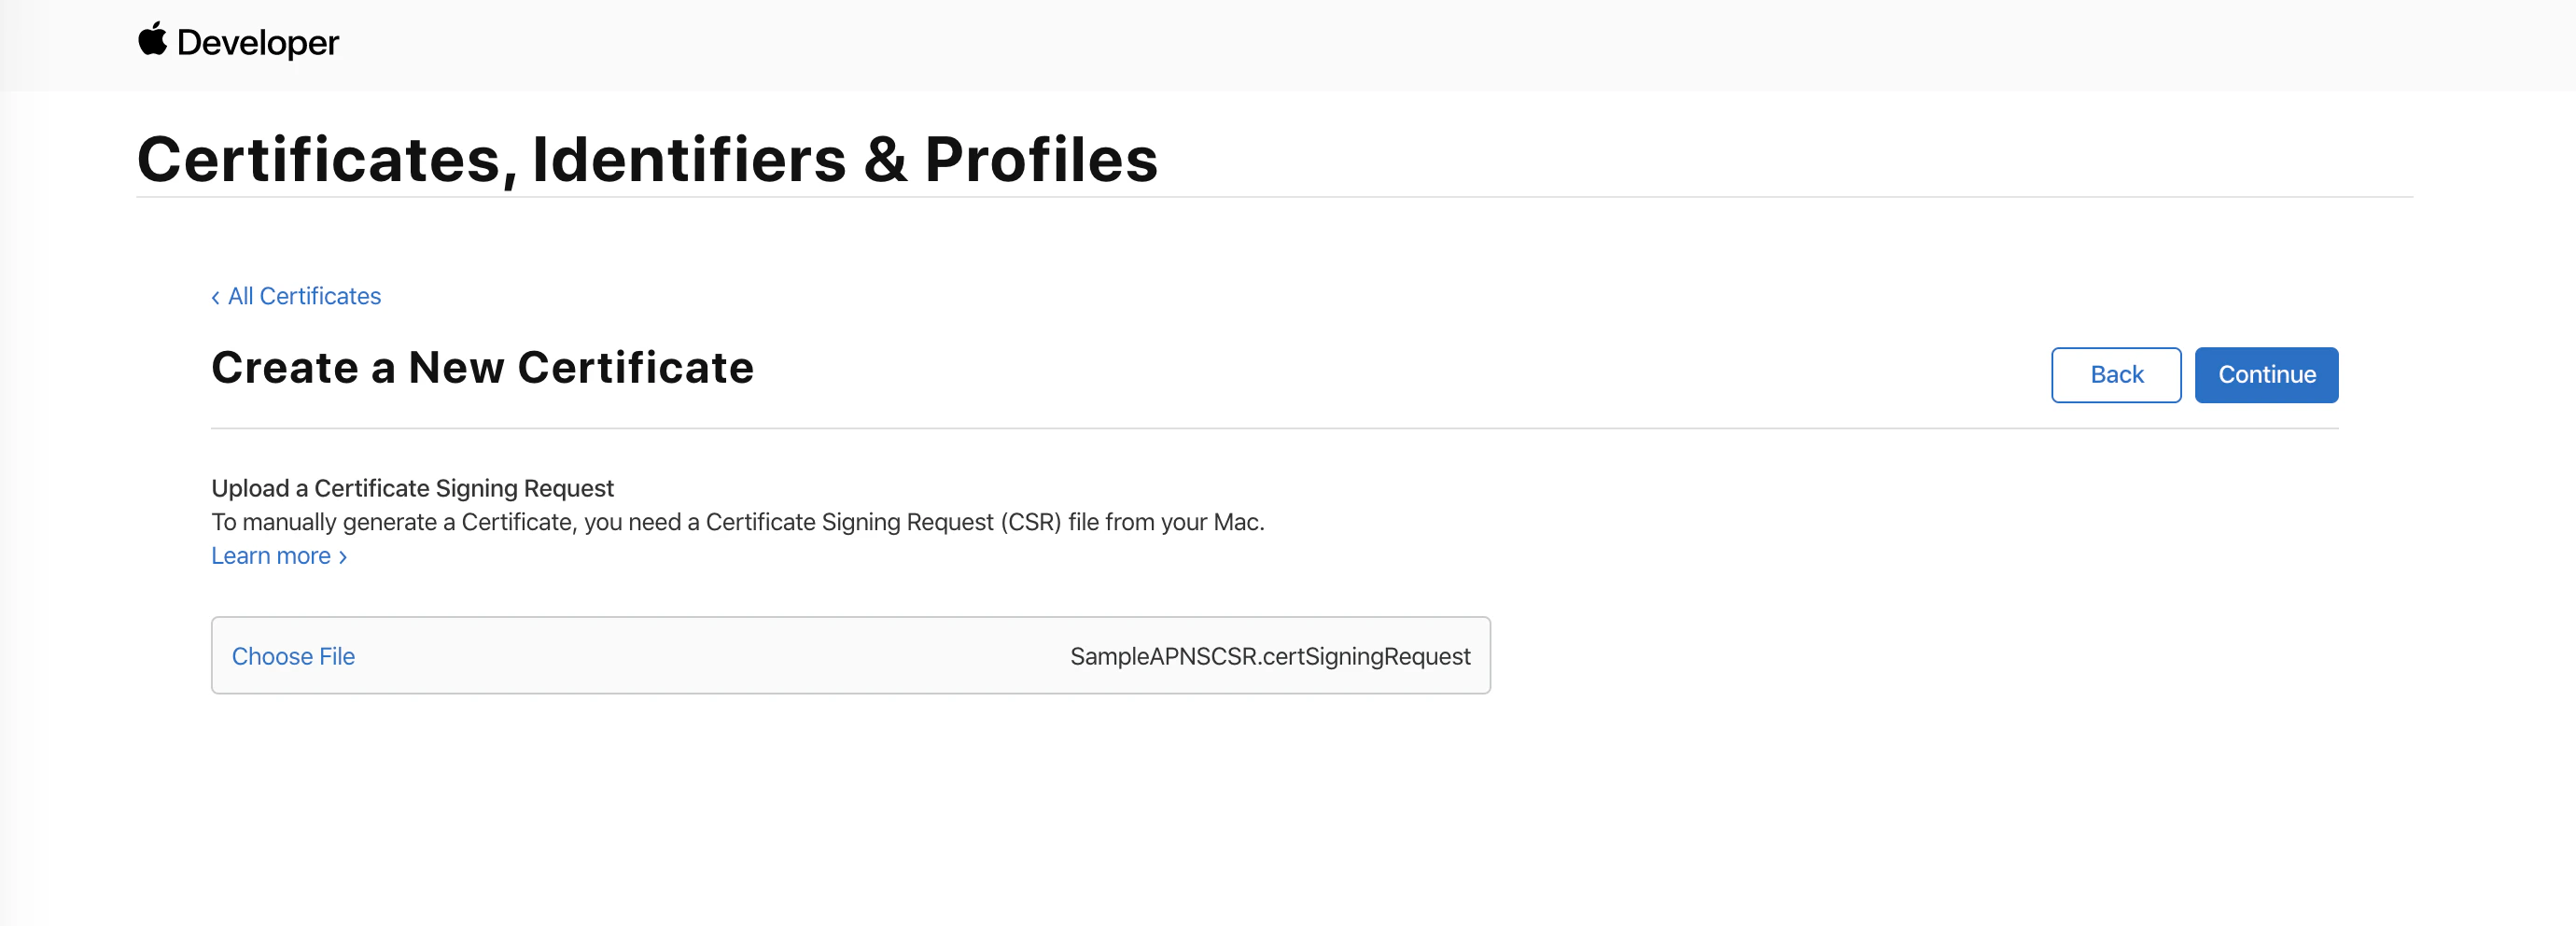
Now choose the `certificate signing request` file created in the first step and click Continue as shown below:
**APP ID Selection Note**
Ensure **Push Notification** capability is enabled for the App(App ID selected) you are creating an APNS certificate for.
Now choose the `certificate signing request` file created in the first step and click Continue as shown below:
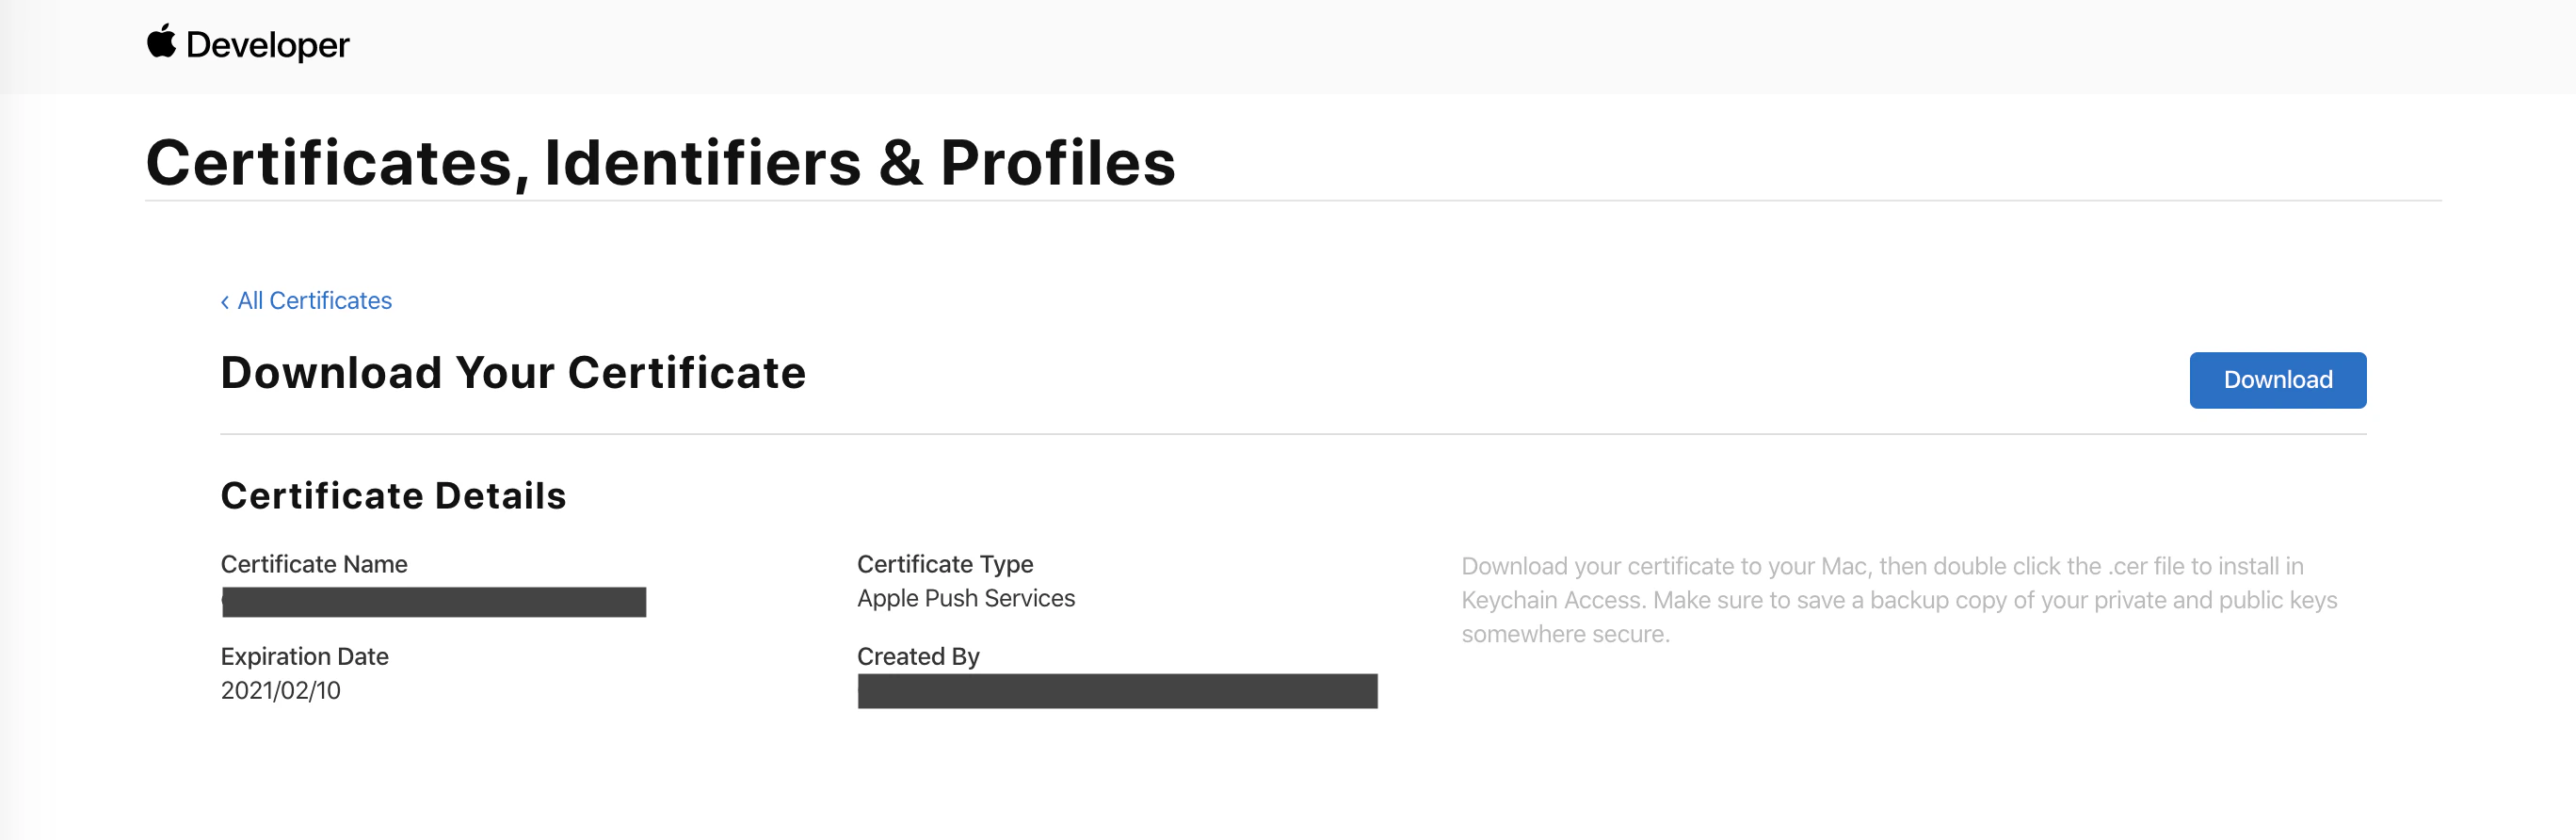
 That's it! Your APNS certificate has been successfully created. Go ahead and download the same and open it to include it in your Mac `Keychain Access`
 # Converting Certificate to PEM format
Follow the below steps to convert the APNS certificate obtained in the previous step to `.pem` file:
1. First, go to **Keychain Access** and select your APNS certificate, then right-click on it select **Export** option. Now export your certificate in `.p12` format. You will be prompted to provide a password for `.p12`, do the same.
2. Convert the `.p12` file obtained in the previous step into a `.pem` file by using **openssl** commands as shown below, here you will have to provide the `Import Password`:
```ruby Ruby wrap theme={"theme":{"light":"github-light","dark":"github-dark"}}
openssl pkcs12 -in p12Cert.p12 -out pemAPNSCert.pem -nodes -legacy
Enter Import Password:
MAC verified OK
```
**Note**
You can also go the SSL Converter [here](https://www.sslshopper.com/ssl-converter.html) and convert your `.p12` file to `.pem`.
# Verify .pem file
Before uploading the certificate to MoEngage Dashboard, verify the `.pem` file obtained:
1. First, open the `.pem` in a text editor to view its content. The certificate content should be in format as shown below. Make sure the pem file contains both Certificate content(from `BEGIN CERTIFICATE` to `END CERTIFICATE`) as well as Certificate Private Key (from `BEGIN PRIVATE KEY` to `END PRIVATE KEY`)
```text Text theme={"theme":{"light":"github-light","dark":"github-dark"}}
Bag Attributes
friendlyName: Apple Push Services:
localKeyID: <>
subject=<>
-----BEGIN CERTIFICATE-----
-----END CERTIFICATE-----
Bag Attributes
friendlyName: <>
localKeyID: <>
Key Attributes:
-----BEGIN PRIVATE KEY-----
-----END PRIVATE KEY-----
```
2. Also, you check the validity of the certificate by going to SSLShopper [Certificate Decoder](https://www.sslshopper.com/certificate-decoder.html) and pasting the Certificate Content (from `BEGIN CERTIFICATE` to `END CERTIFICATE`) to get all the info about the certificate as shown below:
# Converting Certificate to PEM format
Follow the below steps to convert the APNS certificate obtained in the previous step to `.pem` file:
1. First, go to **Keychain Access** and select your APNS certificate, then right-click on it select **Export** option. Now export your certificate in `.p12` format. You will be prompted to provide a password for `.p12`, do the same.
2. Convert the `.p12` file obtained in the previous step into a `.pem` file by using **openssl** commands as shown below, here you will have to provide the `Import Password`:
```ruby Ruby wrap theme={"theme":{"light":"github-light","dark":"github-dark"}}
openssl pkcs12 -in p12Cert.p12 -out pemAPNSCert.pem -nodes -legacy
Enter Import Password:
MAC verified OK
```
**Note**
You can also go the SSL Converter [here](https://www.sslshopper.com/ssl-converter.html) and convert your `.p12` file to `.pem`.
# Verify .pem file
Before uploading the certificate to MoEngage Dashboard, verify the `.pem` file obtained:
1. First, open the `.pem` in a text editor to view its content. The certificate content should be in format as shown below. Make sure the pem file contains both Certificate content(from `BEGIN CERTIFICATE` to `END CERTIFICATE`) as well as Certificate Private Key (from `BEGIN PRIVATE KEY` to `END PRIVATE KEY`)
```text Text theme={"theme":{"light":"github-light","dark":"github-dark"}}
Bag Attributes
friendlyName: Apple Push Services:
localKeyID: <>
subject=<>
-----BEGIN CERTIFICATE-----
-----END CERTIFICATE-----
Bag Attributes
friendlyName: <>
localKeyID: <>
Key Attributes:
-----BEGIN PRIVATE KEY-----
-----END PRIVATE KEY-----
```
2. Also, you check the validity of the certificate by going to SSLShopper [Certificate Decoder](https://www.sslshopper.com/certificate-decoder.html) and pasting the Certificate Content (from `BEGIN CERTIFICATE` to `END CERTIFICATE`) to get all the info about the certificate as shown below:
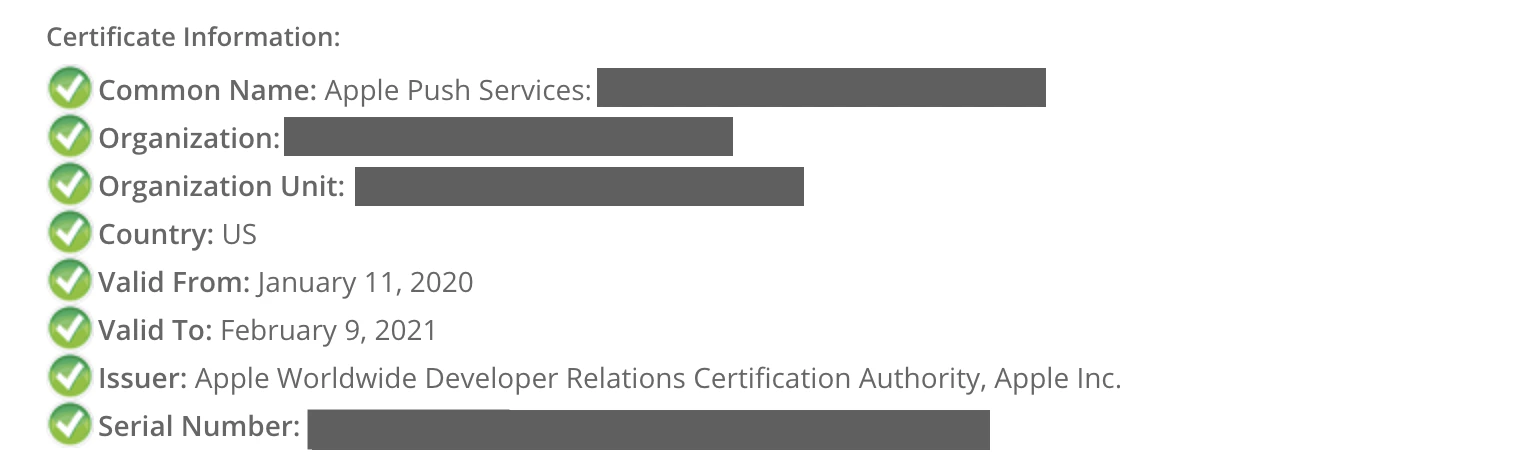 As you can see, the Common Name should contain **Apple Push Services** and the App's Bundle ID. Confirm the organization's information and also the **Validity** of the Certificate. Once everything is verified, upload the certificate to our dashboard.
# Uploading PEM file to MoEngage Dashboard
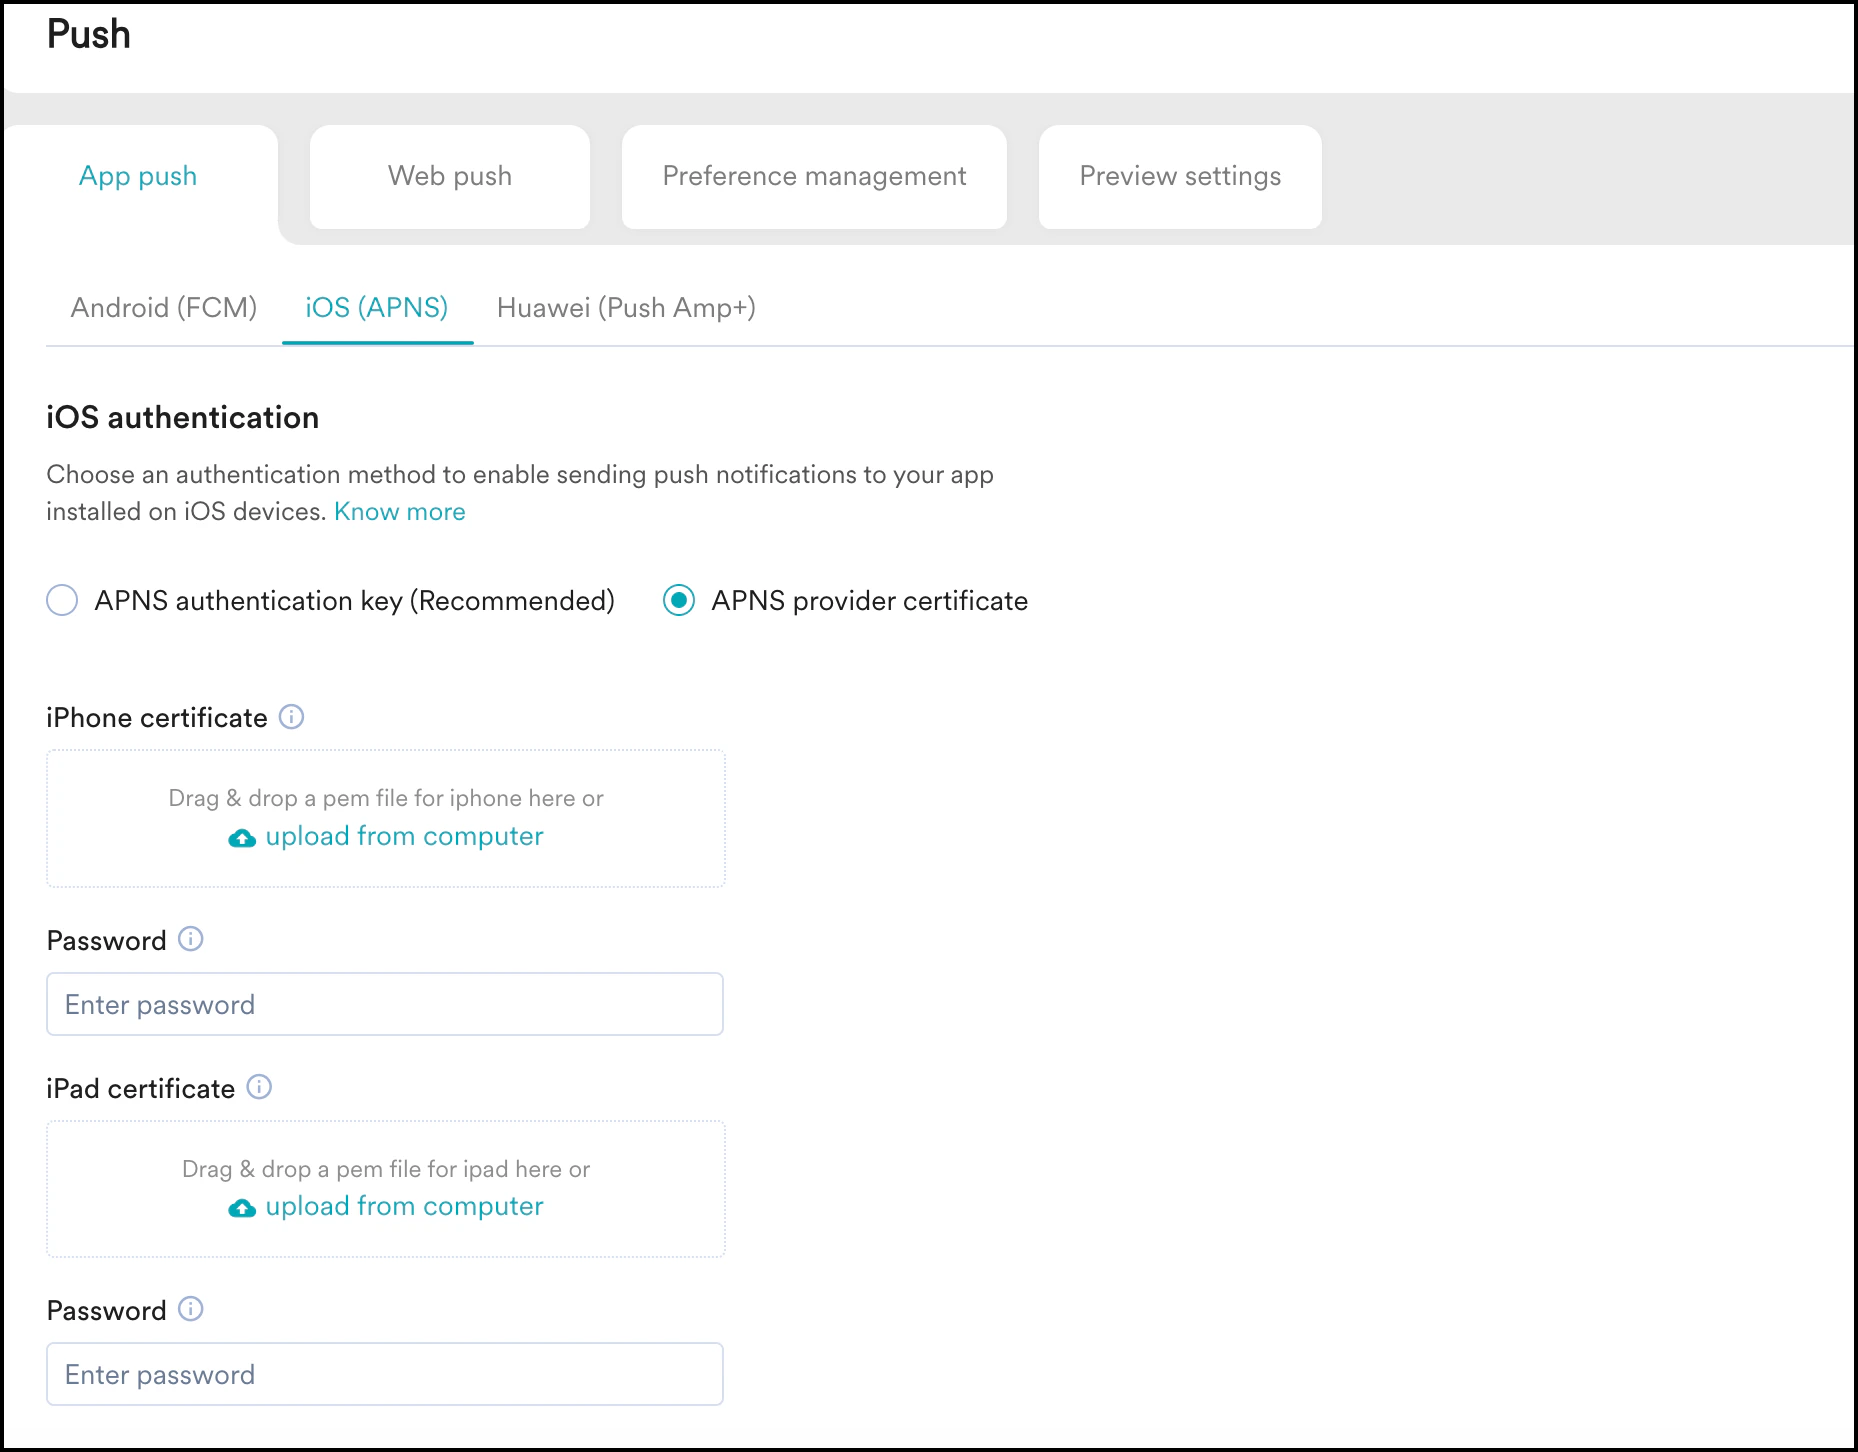
1. Navigate to **Settings > Channels > Push > App Push**.
2. Select iOS (APNS) in the Platforms available on the menu at the top.
3. Click on **APNS provider certificate**.
4. Upload the *.pem* file. Enter the password for the *.pem* file, or leave it blank if there isn't any.
As you can see, the Common Name should contain **Apple Push Services** and the App's Bundle ID. Confirm the organization's information and also the **Validity** of the Certificate. Once everything is verified, upload the certificate to our dashboard.
# Uploading PEM file to MoEngage Dashboard
1. Navigate to **Settings > Channels > Push > App Push**.
2. Select iOS (APNS) in the Platforms available on the menu at the top.
3. Click on **APNS provider certificate**.
4. Upload the *.pem* file. Enter the password for the *.pem* file, or leave it blank if there isn't any.
 **iPad Support**
In case you have different apps for iPhones and iPads(Different Bundle IDs), set up certificates for both iOS and iPad separately in the dashboard in order to be able to send the messages to all the devices.
# Test/Live Builds
* If you are testing the app on **Test Flight or a live app store build**, make sure you upload the ad-hoc or production pem to our dashboard. And also in this case you have to send push notifications from the **Live environment** of your account.
* For the dev build, you can upload the development or production certificate in the dashboard, but make sure that you create your campaign in the **Test environment**, as you cannot send push notifications to the dev build from the Live environment.
**iPad Support**
In case you have different apps for iPhones and iPads(Different Bundle IDs), set up certificates for both iOS and iPad separately in the dashboard in order to be able to send the messages to all the devices.
# Test/Live Builds
* If you are testing the app on **Test Flight or a live app store build**, make sure you upload the ad-hoc or production pem to our dashboard. And also in this case you have to send push notifications from the **Live environment** of your account.
* For the dev build, you can upload the development or production certificate in the dashboard, but make sure that you create your campaign in the **Test environment**, as you cannot send push notifications to the dev build from the Live environment.