> ## Documentation Index
> Fetch the complete documentation index at: https://moengage-sdk-docs.mintlify.site/llms.txt
> Use this file to discover all available pages before exploring further.
# Broadcast Live Activity
# Overview
[iOS Live Activities](https://developer.apple.com/design/human-interface-guidelines/live-activities) display your app's most current data as real-time, interactive updates on the iPhone Lock Screen and in the [Dynamic Island](https://support.apple.com/en-in/guide/iphone/iph28f50d10d/ios). This allows users to track events like sports scores, order status, or flight updates without opening your app, significantly boosting engagement and user experience.
**Information**
Live Activities and push notifications have different user permission models. By default, Live Activities are enabled for an app. Users can manage permissions for each app individually in their device settings.
**Prerequisites**
Before you begin, ensure your project and accounts are configured correctly.
1. **Apple Developer Account Configuration**:
* In your Apple Developer account, navigate to **Certificates**, **IDs & Profiles** > **Identifiers** and select your app's identifier.
* Under the **Capabilities** tab, ensure that **Push Notifications** and **Broadcast Capability** checkboxes are selected. This is mandatory for the Apple Push Notification service (APNs) to deliver activity updates.
 * **APNs Authentication Key**: To authorize MoEngage to send push notifications on your behalf, you must configure an APNs Authentication Key. For detailed steps on how to upload the .p8 file to the MoEngage dashboard, please refer to the [documentation](/developer-guide/ios-sdk/push/basic/apns-authentication-key) on APNs Authentication Key
2. **Xcode and iOS Version**:
* **Xcode**: Use Xcode 14.1 or later.
* **iOS Target**: Your Live Activity must target iOS 18 and later.
# Implementing a Live Activity
This section covers the client-side setup required within your Xcode project.
## Step 1: Add a Widget Extension
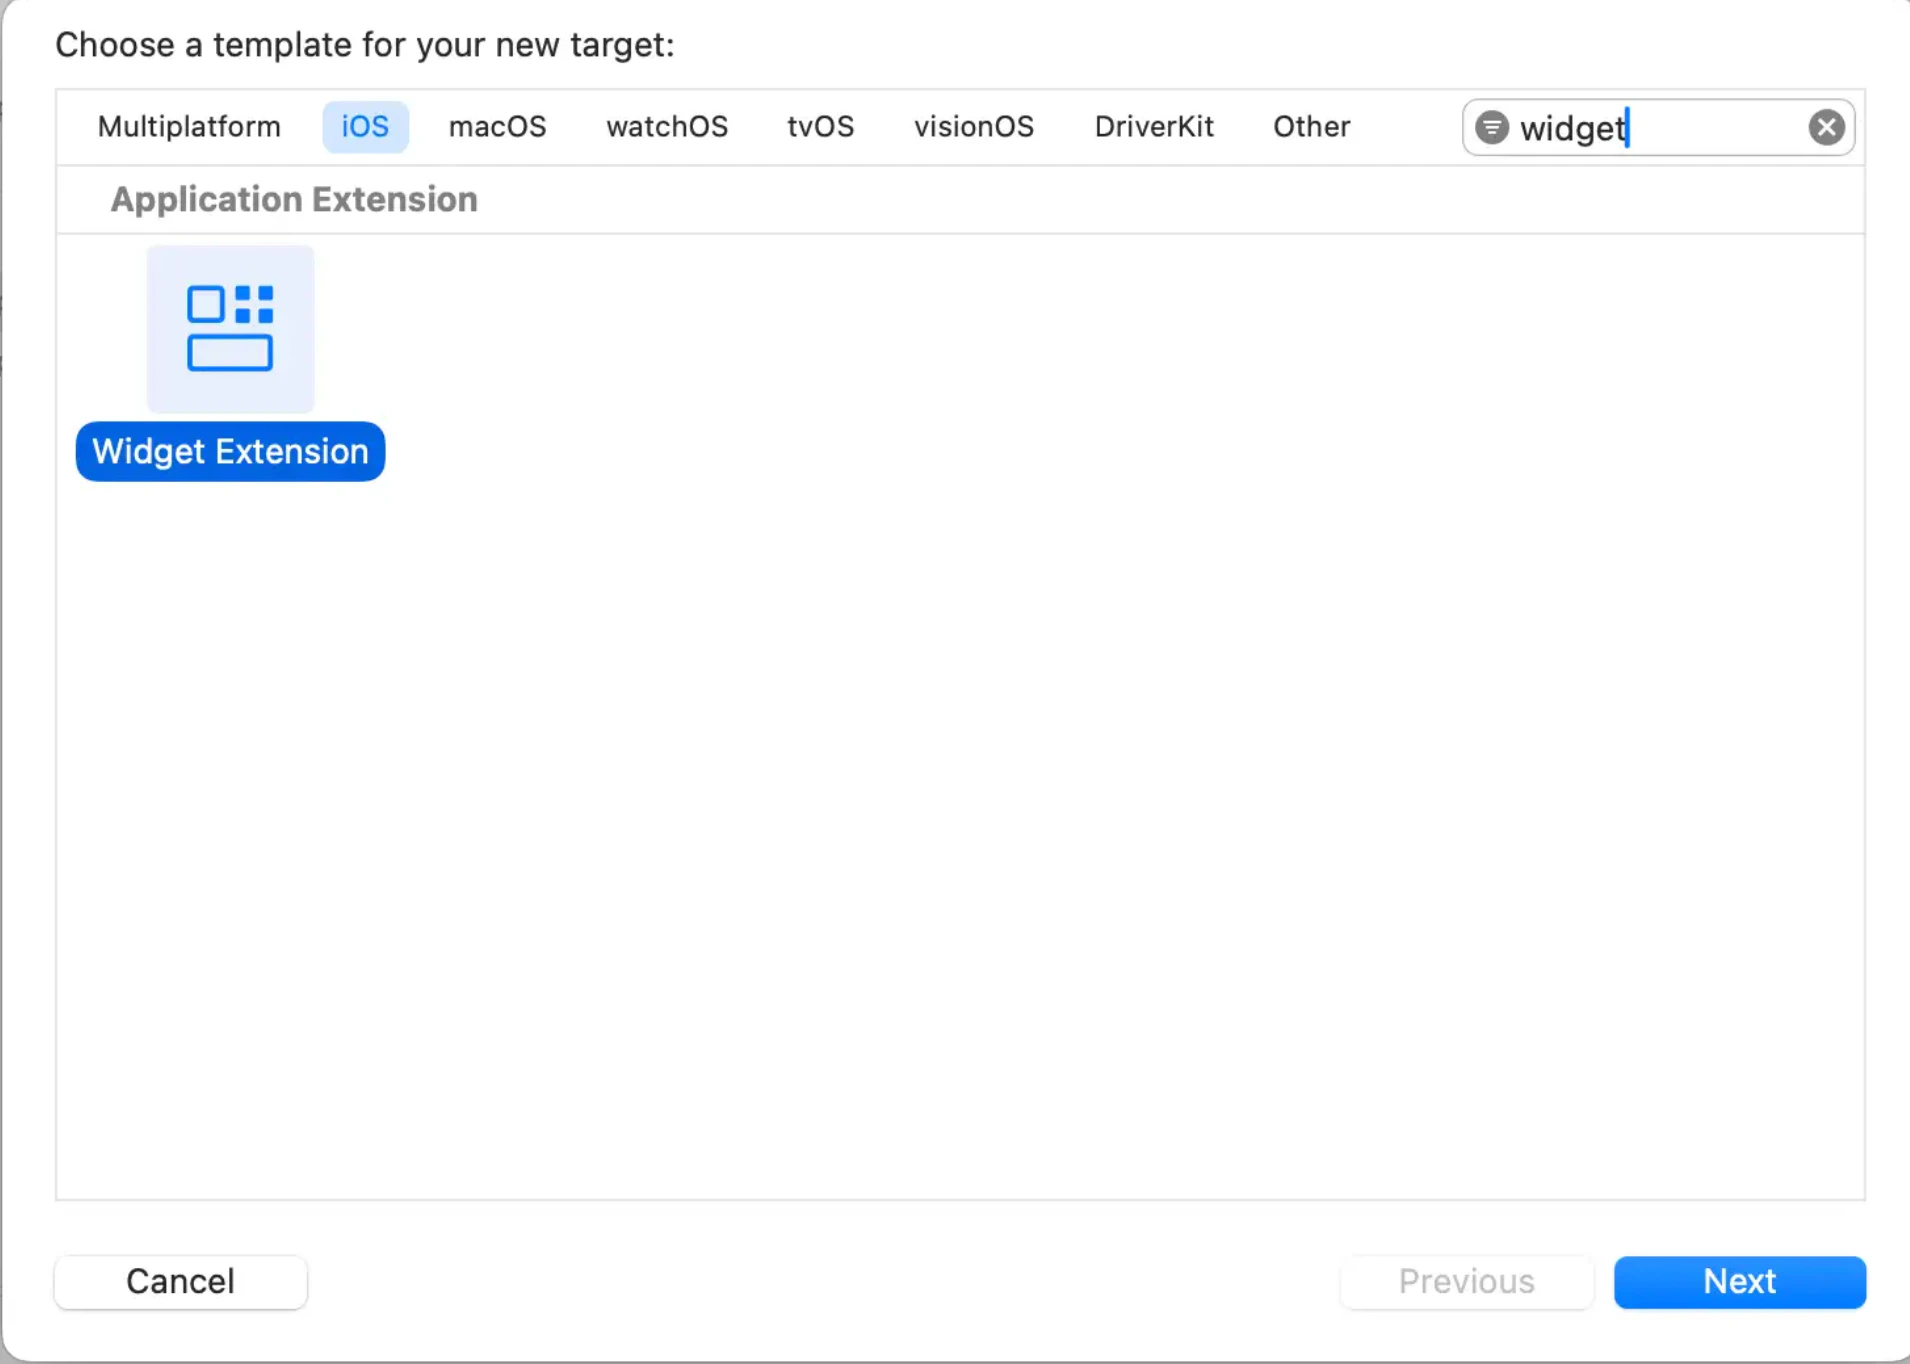
1. In Xcode, navigate to **File** > **New** > **Target**.
2. Select **Widget Extension** and click **Next**.
* **APNs Authentication Key**: To authorize MoEngage to send push notifications on your behalf, you must configure an APNs Authentication Key. For detailed steps on how to upload the .p8 file to the MoEngage dashboard, please refer to the [documentation](/developer-guide/ios-sdk/push/basic/apns-authentication-key) on APNs Authentication Key
2. **Xcode and iOS Version**:
* **Xcode**: Use Xcode 14.1 or later.
* **iOS Target**: Your Live Activity must target iOS 18 and later.
# Implementing a Live Activity
This section covers the client-side setup required within your Xcode project.
## Step 1: Add a Widget Extension
1. In Xcode, navigate to **File** > **New** > **Target**.
2. Select **Widget Extension** and click **Next**.
 3. Enter a product name for your widget.
4. Select the **Include Live Activities** checkbox.
3. Enter a product name for your widget.
4. Select the **Include Live Activities** checkbox.
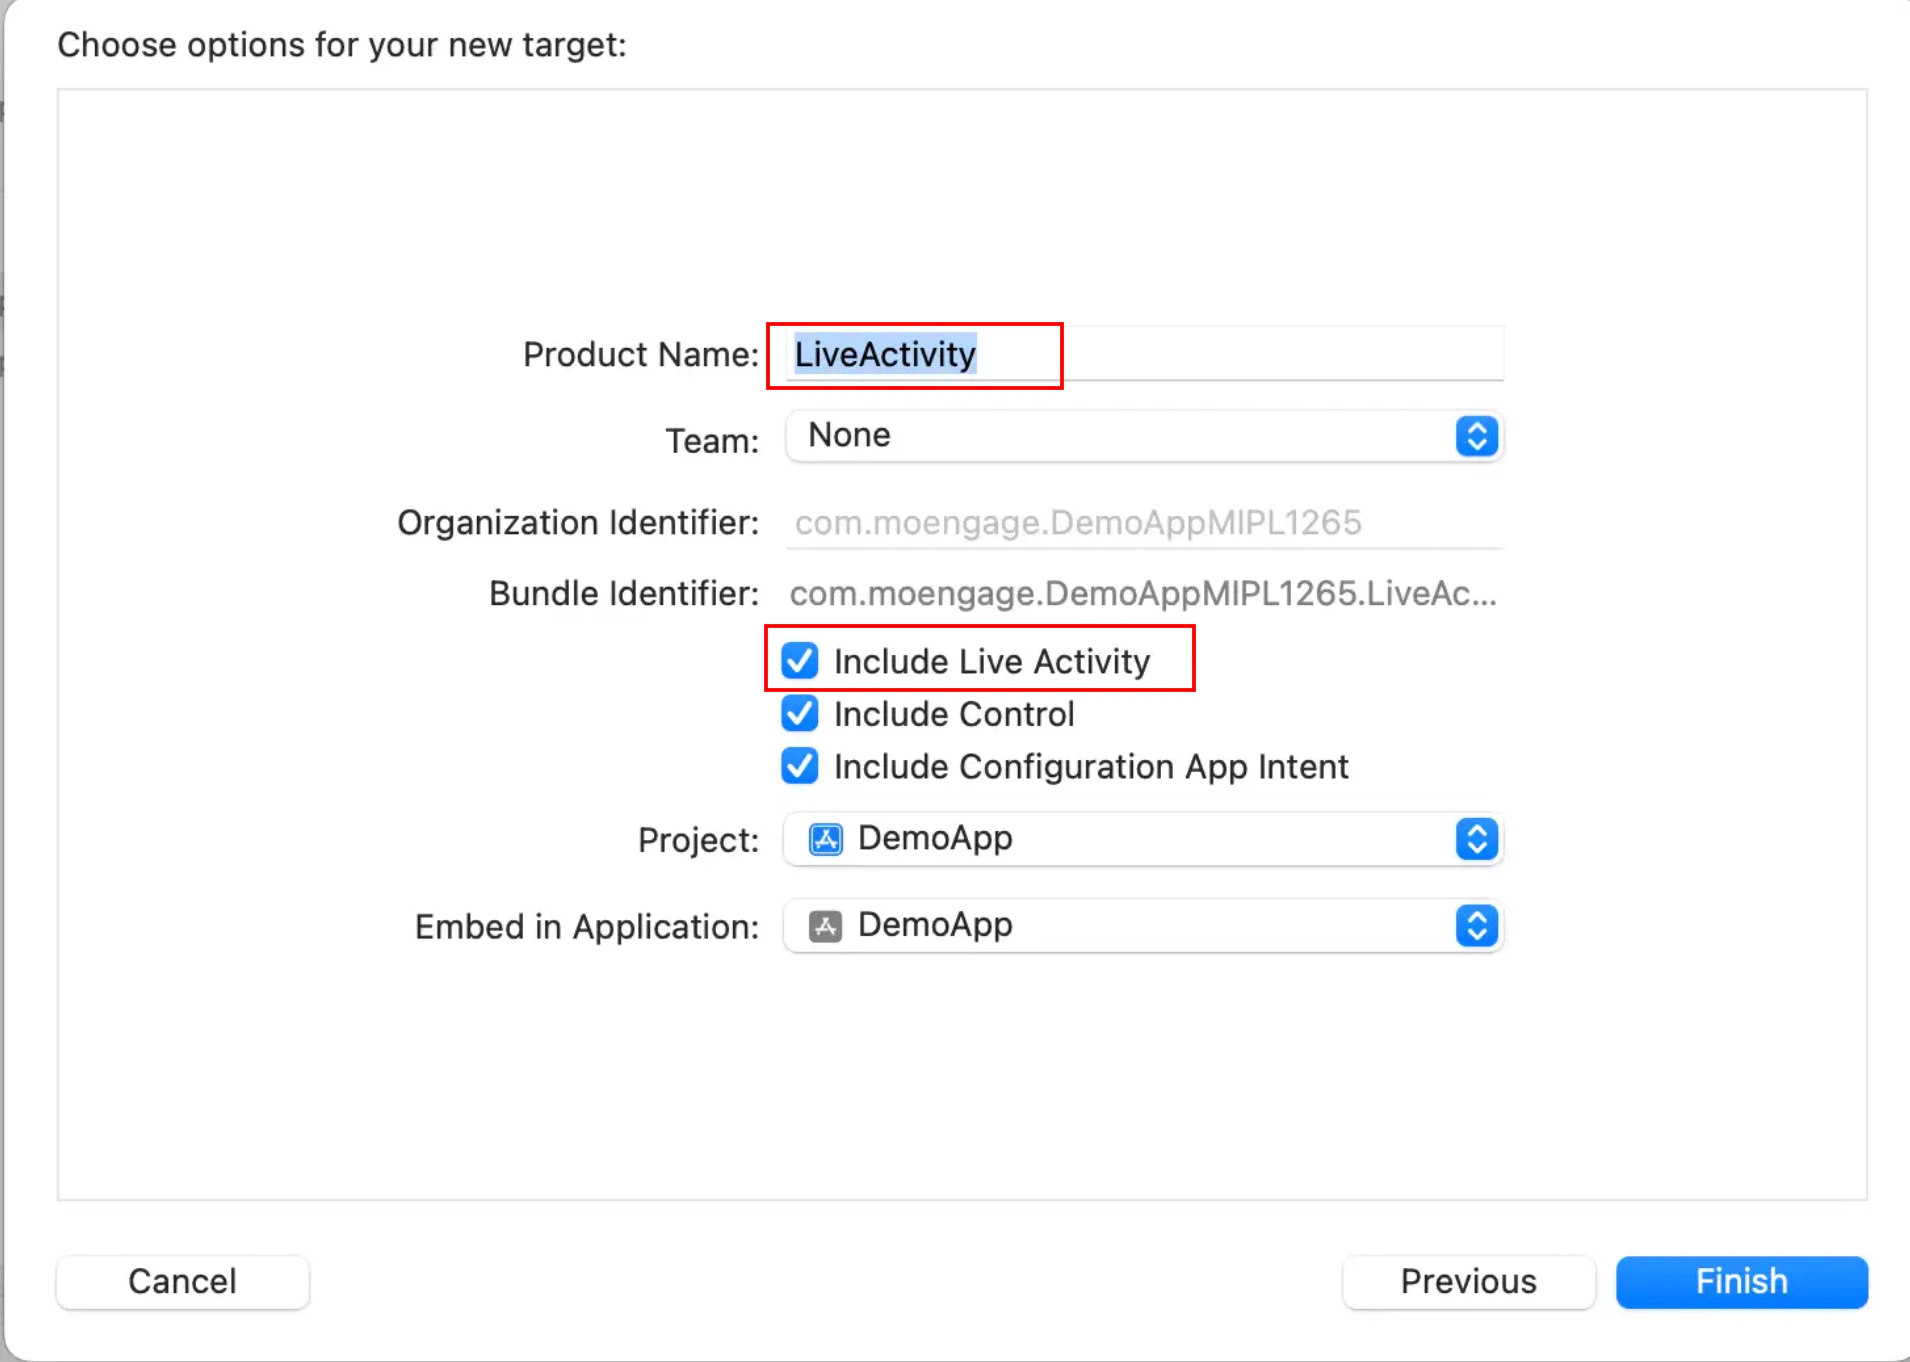 5. Click **Finish**.
## Step 2: Configure App's Info.plist
Add Live Activities support to your main app's Info.plist.
```xml XML wrap theme={"theme":{"light":"github-light","dark":"github-dark"}}
NSSupportsLiveActivities
```
## Step 3: MoEngageLiveActivity integration
**Information**
To integrate the MoEngageLiveActivity framework, ensure you are using the appropriate MoEngage-iOS-SDK version.
#### **Install using Swift Package Manager (Recommended )**
MoEngageLiveActivity framework is supported through SPM from SDK version 10.02.1 To integrate, use the GitHub url [https://github.com/moengage/apple-sdk.git](https://github.com/moengage/apple-sdk.git) and set the branch as master or required version.
#### **Install using CocoaPod**
**Information**
CocoaPods is being deprecated. MoEngage recommends using Swift Package Manager for all new integrations. For more info on CocoaPods, refer to [CocoaPods Integration Guide](/developer-guide/ios-sdk/sdk-integration/basic/integration-through-cocoa-pods).
To integrate the MoEngageLiveActivity framework, add the following dependency to your Podfile:
```ruby Ruby wrap theme={"theme":{"light":"github-light","dark":"github-dark"}}
target 'MoETest' do
use_frameworks!
# Pods for app target
pod 'MoEngage-iOS-SDK' # specify version constraint
pod 'MoEngage-iOS-SDK/LiveActivity'
target 'LiveActivity' do
use_frameworks!
inherit! :search_paths
# Pods for live activity extension target
pod 'MoEngage-iOS-SDK/LiveActivity'
end
end
```
## Step 4: Define the Live Activity Attributes
In the Swift file generated for your widget extension, define the data structure for your Live Activity.
1. Configure ActivityAttributes: Create a struct that conforms to [ActivityAttributes](https://developer.apple.com/documentation/activitykit/activityattributes). This struct will contain:
* **Static Data**: Attributes that are set once and do not change.
* **ContentState**: A nested struct for dynamic data that will be updated in real-time.
```swift Swift wrap theme={"theme":{"light":"github-light","dark":"github-dark"}}
import Foundation
import ActivityKit
import WidgetKit
import SwiftUI
struct FootballActivityAttributes: ActivityAttributes {
public struct ContentState: Codable, Hashable {
// Dynamic stateful properties about your activity go here!
var teamOneScore: Int
var teamTwoScore: Int
}
// Fixed non-changing properties about your activity go here!
var team1Name: String
var team2Name: String
}
```
2. When creating ActivityConfiguration, use *MoEngageActivityAttributes\* instead of FootballActivityAttributes as your ActivityAttributes type.
3. Track widget clicks by configuring the deeplink and widget ID with the moengageWidgetClickURL API.
```swift Swift wrap theme={"theme":{"light":"github-light","dark":"github-dark"}}
import ActivityKit
import WidgetKit
import SwiftUI
import MoEngageLiveActivity
struct FootballActivityWidget: Widget {
var body: some WidgetConfiguration {
ActivityConfiguration(for: MoEngageActivityAttributes.self) { context in
// Lock screen/banner UI goes here
VStack(spacing: 12) {
// UI elements
}
.moengageWidgetClickURL(URL(string: "moeapp://game"), context: context, widgetId: 2)
} dynamicIsland: { context in
DynamicIsland {
// Expanded UI goes here
} compactLeading: {
// Compact Leading UI goes here
} compactTrailing: {
// Compact Trailing UI goes here
} minimal: {
// Minimal UI goes here
}
.moengageWidgetClickURL(URL(string: "moeapp://game"), context: context, widgetId: 1)
}
}
}
```
**Information**
MoEngage recommends that you acquaint yourself with Apple's Live Activities [prerequisites and limitations](https://developer.apple.com/documentation/activitykit/displaying-live-data-with-live-activities#Understand-constraints), as these are distinct from those of MoEngage.
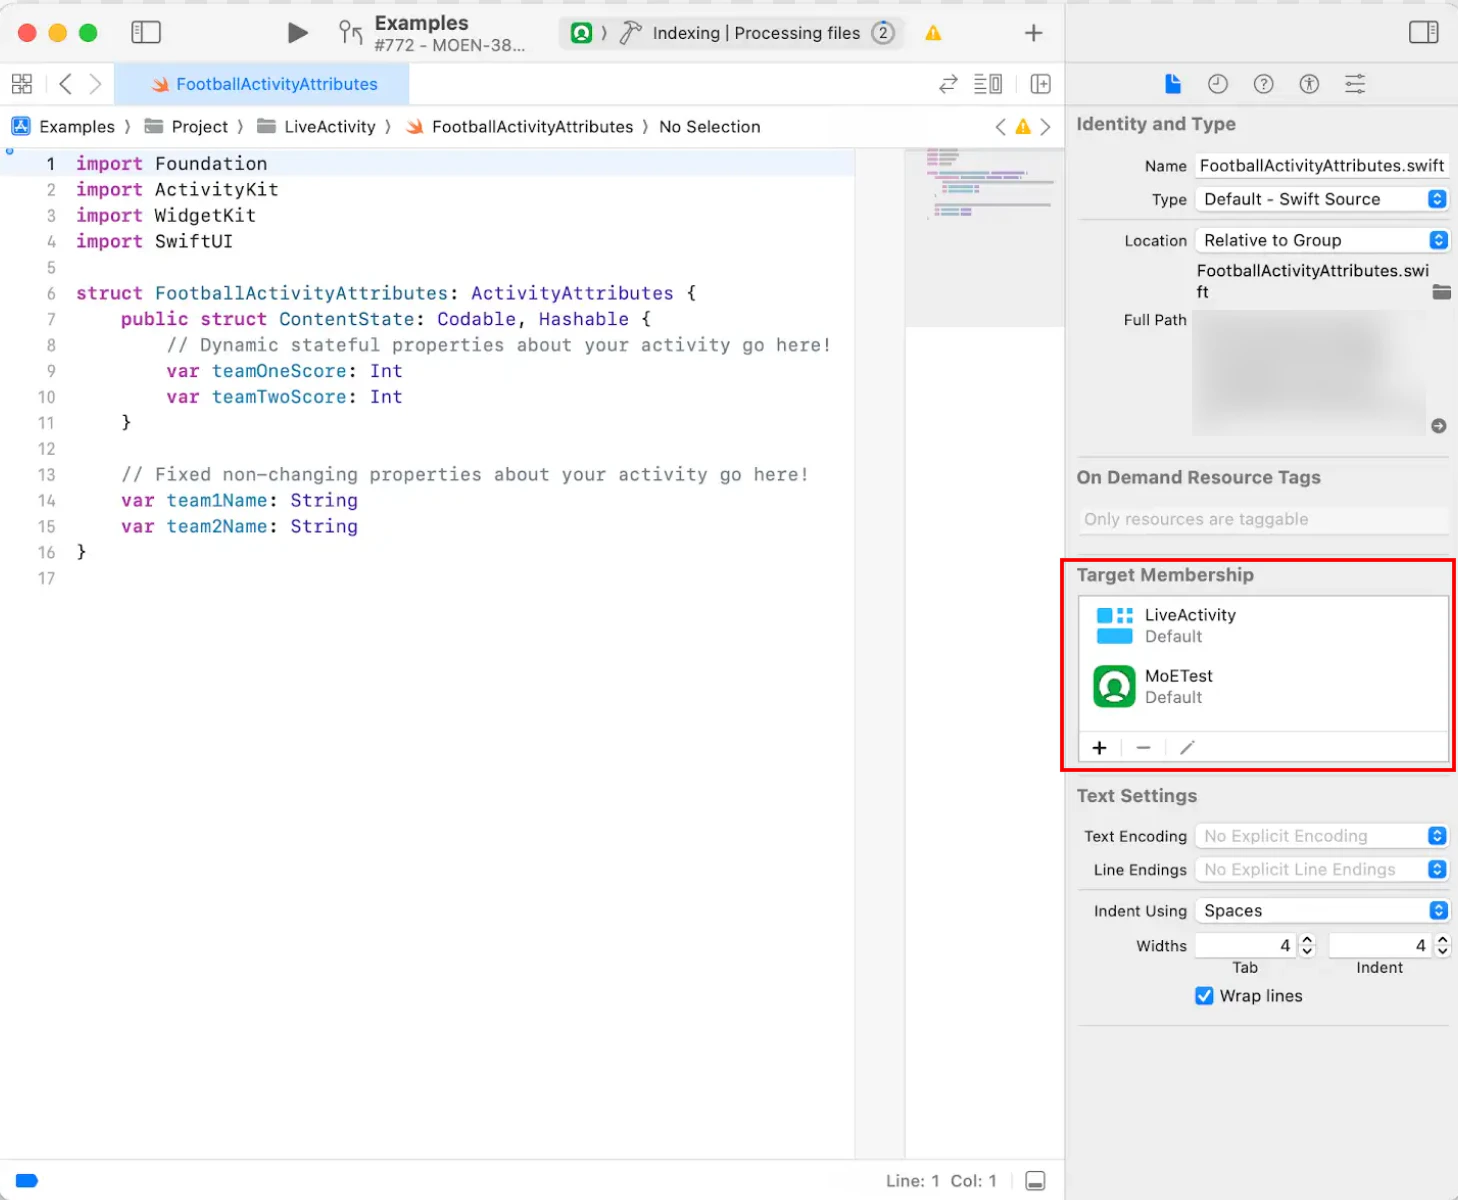
4. **Ensure Target Membership**: Make your ActivityAttributes struct accessible to your main app target.
1. Select the Swift file where you defined your ActivityAttributes.
2. Open the **File Inspector** (Option + Command + 1).
3. In the **Target Membership** section, check the box for your main app target.
5. Click **Finish**.
## Step 2: Configure App's Info.plist
Add Live Activities support to your main app's Info.plist.
```xml XML wrap theme={"theme":{"light":"github-light","dark":"github-dark"}}
NSSupportsLiveActivities
```
## Step 3: MoEngageLiveActivity integration
**Information**
To integrate the MoEngageLiveActivity framework, ensure you are using the appropriate MoEngage-iOS-SDK version.
#### **Install using Swift Package Manager (Recommended )**
MoEngageLiveActivity framework is supported through SPM from SDK version 10.02.1 To integrate, use the GitHub url [https://github.com/moengage/apple-sdk.git](https://github.com/moengage/apple-sdk.git) and set the branch as master or required version.
#### **Install using CocoaPod**
**Information**
CocoaPods is being deprecated. MoEngage recommends using Swift Package Manager for all new integrations. For more info on CocoaPods, refer to [CocoaPods Integration Guide](/developer-guide/ios-sdk/sdk-integration/basic/integration-through-cocoa-pods).
To integrate the MoEngageLiveActivity framework, add the following dependency to your Podfile:
```ruby Ruby wrap theme={"theme":{"light":"github-light","dark":"github-dark"}}
target 'MoETest' do
use_frameworks!
# Pods for app target
pod 'MoEngage-iOS-SDK' # specify version constraint
pod 'MoEngage-iOS-SDK/LiveActivity'
target 'LiveActivity' do
use_frameworks!
inherit! :search_paths
# Pods for live activity extension target
pod 'MoEngage-iOS-SDK/LiveActivity'
end
end
```
## Step 4: Define the Live Activity Attributes
In the Swift file generated for your widget extension, define the data structure for your Live Activity.
1. Configure ActivityAttributes: Create a struct that conforms to [ActivityAttributes](https://developer.apple.com/documentation/activitykit/activityattributes). This struct will contain:
* **Static Data**: Attributes that are set once and do not change.
* **ContentState**: A nested struct for dynamic data that will be updated in real-time.
```swift Swift wrap theme={"theme":{"light":"github-light","dark":"github-dark"}}
import Foundation
import ActivityKit
import WidgetKit
import SwiftUI
struct FootballActivityAttributes: ActivityAttributes {
public struct ContentState: Codable, Hashable {
// Dynamic stateful properties about your activity go here!
var teamOneScore: Int
var teamTwoScore: Int
}
// Fixed non-changing properties about your activity go here!
var team1Name: String
var team2Name: String
}
```
2. When creating ActivityConfiguration, use *MoEngageActivityAttributes\* instead of FootballActivityAttributes as your ActivityAttributes type.
3. Track widget clicks by configuring the deeplink and widget ID with the moengageWidgetClickURL API.
```swift Swift wrap theme={"theme":{"light":"github-light","dark":"github-dark"}}
import ActivityKit
import WidgetKit
import SwiftUI
import MoEngageLiveActivity
struct FootballActivityWidget: Widget {
var body: some WidgetConfiguration {
ActivityConfiguration(for: MoEngageActivityAttributes.self) { context in
// Lock screen/banner UI goes here
VStack(spacing: 12) {
// UI elements
}
.moengageWidgetClickURL(URL(string: "moeapp://game"), context: context, widgetId: 2)
} dynamicIsland: { context in
DynamicIsland {
// Expanded UI goes here
} compactLeading: {
// Compact Leading UI goes here
} compactTrailing: {
// Compact Trailing UI goes here
} minimal: {
// Minimal UI goes here
}
.moengageWidgetClickURL(URL(string: "moeapp://game"), context: context, widgetId: 1)
}
}
}
```
**Information**
MoEngage recommends that you acquaint yourself with Apple's Live Activities [prerequisites and limitations](https://developer.apple.com/documentation/activitykit/displaying-live-data-with-live-activities#Understand-constraints), as these are distinct from those of MoEngage.
4. **Ensure Target Membership**: Make your ActivityAttributes struct accessible to your main app target.
1. Select the Swift file where you defined your ActivityAttributes.
2. Open the **File Inspector** (Option + Command + 1).
3. In the **Target Membership** section, check the box for your main app target.
 # Managing the Live Activity Lifecycle
Once your app is configured, you can start, update, and end Live Activities using a combination of local app code and MoEngage APIs.
## Step 5: Create a Live Activity Campaign (One-Time Setup)
Before you can start a Live Activity, you must first [create a campaign](https://developers.moengage.com/hc/en-us/articles/38466364097044-Create-Push-Campaigns) on the MoEngage platform. This one-time API call defines the campaign's properties, such as the target audience and conversion goals.
Upon successful creation, the API returns a channel\_id. This ID is essential for two reasons:
* It identifies the campaign you want to start remotely for a target segment.
* It allows users outside the original target segment to start the same Live Activity locally from within your app (e.g., by tapping a button).
For more information, refer [here](https://developers.moengage.com/hc/en-us/articles/38466364097044-Create-Push-Campaigns).
**Success/Developer Info**
Your server should store the returned channel\_id, MoEngage metadata, and make it available to your mobile app. Your app will need this data to initiate the Live Activity locally.
## Step 6: Start a Live Activity
A Live Activity instance can be started remotely via a push or locally from the app.
### Push-to-Start (Remote)
Start an activity for your defined audience using a push notification. For more information, refer [here](https://www.moengage.com/docs/api/live-activities/start-broadcast-live-activity).
### Click-to-Start (Local)
Start an activity from within the app, triggered by a user action.
Get Live Activity data from the [createAttributes(withCampaign:completion:)](https://moengage.github.io/ios-api-reference/Enums/MoEngageSDKLiveActivity.html#/s:20MoEngageLiveActivity0ab7SDKLiveD0O16createAttributes12withCampaign4file0J2Id6method4line6column10completionyAC0I0Vy_xG_s12StaticStringVA2PS2uyAM6ResultVy_x_GSgScMYcct0D3Kit0dG0RzlFZ) or [createAttributes(withCampaign:) async](https://moengage.github.io/ios-api-reference/Enums/MoEngageSDKLiveActivity.html#/s:20MoEngageLiveActivity0ab7SDKLiveD0O16createAttributes12withCampaign4file0J2Id6method4line6columnAC0I0V6ResultVy_x_GSgALy_xG_s12StaticStringVA2SS2utYa0D3Kit0dG0RzlFZ) SDK APIs by combining your application's ActivityAttributes data with mandatory MoEngage metadata (retrieved from your server). Use Apple's Activity.request() method with channel\_id (retrieved from your server) to start Live Activity. This links the locally started activity to your campaign.
**Information**
Once Live Activity is started, the Live Activity Started event needs to be tracked using the [trackStarted(activity:)](https://moengage.github.io/ios-api-reference/Enums/MoEngageSDKLiveActivity.html#/s:20MoEngageLiveActivity0ab7SDKLiveD0O12trackStarted8activity4file0I2Id6method4line6columny0D3Kit0D0CyAA0abD10AttributesVyxGG_s12StaticStringVA2SS2utAK0dO0RzlFZ) API.
```swift Swift wrap theme={"theme":{"light":"github-light","dark":"github-dark"}}
import MoEngageLiveActivity
guard #available(iOS 18, *) else { return }
guard let result = await MoEngageSDKLiveActivity.createAttributes(
withCampaign: MoEngageSDKLiveActivity.Campaign(
campaignId: "Your Campaign Id", campaignName: "Your Campaign Name",
deliveryType: "Broadcast Live Activity",
attributeType: "\(FootballActivityAttributes.self)",
instanceId: "Your Instance Id",
appAttributes: FootballActivityAttributes(team1Name: "Chiefs", team2Name: "Bills"),
appContent: FootballActivityAttributes.ContentState(teamOneScore: 0, teamTwoScore: 0)
)
) else { return }
do {
let activity = try MoEngageActivity.request(
attributes: result.attributes,
content: .init(
state: result.content, staleDate: .distantFuture,
relevanceScore: 10
),
pushType: .channel("Your channel Id"), style: .standard
)
// Track started event
MoEngageSDKLiveActivity.trackStarted(activity: activity)
} catch {
// log error
}
```
## Step 7: Update a Live Activity
Update an activity for your defined audience using a push notification. For more information, refer [here](https://www.moengage.com/docs/api/live-activities/update-broadcast-live-activity).
## Step 8: End a Live Activity
A Live Activity can end through user dismissal, a system timeout, or a command from your server. For more information, refer [here](https://www.moengage.com/docs/api/live-activities/end-broadcast-live-activity).
# Managing the Live Activity Lifecycle
Once your app is configured, you can start, update, and end Live Activities using a combination of local app code and MoEngage APIs.
## Step 5: Create a Live Activity Campaign (One-Time Setup)
Before you can start a Live Activity, you must first [create a campaign](https://developers.moengage.com/hc/en-us/articles/38466364097044-Create-Push-Campaigns) on the MoEngage platform. This one-time API call defines the campaign's properties, such as the target audience and conversion goals.
Upon successful creation, the API returns a channel\_id. This ID is essential for two reasons:
* It identifies the campaign you want to start remotely for a target segment.
* It allows users outside the original target segment to start the same Live Activity locally from within your app (e.g., by tapping a button).
For more information, refer [here](https://developers.moengage.com/hc/en-us/articles/38466364097044-Create-Push-Campaigns).
**Success/Developer Info**
Your server should store the returned channel\_id, MoEngage metadata, and make it available to your mobile app. Your app will need this data to initiate the Live Activity locally.
## Step 6: Start a Live Activity
A Live Activity instance can be started remotely via a push or locally from the app.
### Push-to-Start (Remote)
Start an activity for your defined audience using a push notification. For more information, refer [here](https://www.moengage.com/docs/api/live-activities/start-broadcast-live-activity).
### Click-to-Start (Local)
Start an activity from within the app, triggered by a user action.
Get Live Activity data from the [createAttributes(withCampaign:completion:)](https://moengage.github.io/ios-api-reference/Enums/MoEngageSDKLiveActivity.html#/s:20MoEngageLiveActivity0ab7SDKLiveD0O16createAttributes12withCampaign4file0J2Id6method4line6column10completionyAC0I0Vy_xG_s12StaticStringVA2PS2uyAM6ResultVy_x_GSgScMYcct0D3Kit0dG0RzlFZ) or [createAttributes(withCampaign:) async](https://moengage.github.io/ios-api-reference/Enums/MoEngageSDKLiveActivity.html#/s:20MoEngageLiveActivity0ab7SDKLiveD0O16createAttributes12withCampaign4file0J2Id6method4line6columnAC0I0V6ResultVy_x_GSgALy_xG_s12StaticStringVA2SS2utYa0D3Kit0dG0RzlFZ) SDK APIs by combining your application's ActivityAttributes data with mandatory MoEngage metadata (retrieved from your server). Use Apple's Activity.request() method with channel\_id (retrieved from your server) to start Live Activity. This links the locally started activity to your campaign.
**Information**
Once Live Activity is started, the Live Activity Started event needs to be tracked using the [trackStarted(activity:)](https://moengage.github.io/ios-api-reference/Enums/MoEngageSDKLiveActivity.html#/s:20MoEngageLiveActivity0ab7SDKLiveD0O12trackStarted8activity4file0I2Id6method4line6columny0D3Kit0D0CyAA0abD10AttributesVyxGG_s12StaticStringVA2SS2utAK0dO0RzlFZ) API.
```swift Swift wrap theme={"theme":{"light":"github-light","dark":"github-dark"}}
import MoEngageLiveActivity
guard #available(iOS 18, *) else { return }
guard let result = await MoEngageSDKLiveActivity.createAttributes(
withCampaign: MoEngageSDKLiveActivity.Campaign(
campaignId: "Your Campaign Id", campaignName: "Your Campaign Name",
deliveryType: "Broadcast Live Activity",
attributeType: "\(FootballActivityAttributes.self)",
instanceId: "Your Instance Id",
appAttributes: FootballActivityAttributes(team1Name: "Chiefs", team2Name: "Bills"),
appContent: FootballActivityAttributes.ContentState(teamOneScore: 0, teamTwoScore: 0)
)
) else { return }
do {
let activity = try MoEngageActivity.request(
attributes: result.attributes,
content: .init(
state: result.content, staleDate: .distantFuture,
relevanceScore: 10
),
pushType: .channel("Your channel Id"), style: .standard
)
// Track started event
MoEngageSDKLiveActivity.trackStarted(activity: activity)
} catch {
// log error
}
```
## Step 7: Update a Live Activity
Update an activity for your defined audience using a push notification. For more information, refer [here](https://www.moengage.com/docs/api/live-activities/update-broadcast-live-activity).
## Step 8: End a Live Activity
A Live Activity can end through user dismissal, a system timeout, or a command from your server. For more information, refer [here](https://www.moengage.com/docs/api/live-activities/end-broadcast-live-activity).