> ## Documentation Index
> Fetch the complete documentation index at: https://moengage-sdk-docs.mintlify.site/llms.txt
> Use this file to discover all available pages before exploring further.
# Web Personalization - V2
MoEngage's Web Personalization allows you to personalize the website experience for every visitor with limited or no involvement from tech teams. Ensure that you have followed the SDK integration [doc](/developer-guide/web-sdk/web-sdk-integration/basic-integration/web-sdk-integration) and that the SDK is working properly.
# Prefetch the MoE domain
Add the following code snippet at the top of the `` to prefetch the moengage.com domain:
```javascript JavaScript wrap theme={"theme":{"light":"github-light","dark":"github-dark"}}
```
The 'X' in the API Endpoint URL refers to the MoEngage data center (DC). MoEngage hosts each customer in a different DC. You can find your DC number (value of X) and replace the value of 'X' in the URL by referring to the DC and API endpoint mapping [here](https://help.moengage.com/hc/en-us/articles/360057030512-Data-Centers-in-MoEngage).
# Method 1: Initiate Web P Module
The following table contains the details of the different data centers mapped to the dashboard hosts and is required for integration.
| Data Center | Dashboard host |
| :---------- | :------------------------ |
| dc\_1 | dashboard-01.moengage.com |
| dc\_2 | dashboard-02.moengage.com |
| dc\_3 | dashboard-03.moengage.com |
| dc\_4 | dashboard-04.moengage.com |
| dc\_6 | dashboard-06.moengage.com |
## Production or LIVE Environment
Add this script to initiate the web personalization module:
```javascript JavaScript wrap theme={"theme":{"light":"github-light","dark":"github-dark"}}
```
Change the following fields:
* Replace the 'workspace\_id' in the URL above with the Workspace ID in the MoEngage Dashboard settings. Navigate to Dashboard -> Settings -> App -> General and copy the Workspace ID.
* Replace 'DC' in the URL above with the data center your instance is hosted on. MoEngage hosts each customer in a different data center. Tracked data is stored in the default data center of MoEngage. To find your data center mapping, refer to Data Center Mapping. The possible value is dc\_X where 'X' is your data center number.
* Replace 'sdkVersion' in the URL above with the version of Web SDK that you are using. In case you are using NPM, use the version number of @moengage/web-sdk dependency that is in your package.json file.
For example, if the dashboard URL starts with [https://dashboard-01.moengage.com](https://dashboard-01.moengage.com), your current version of Web SDK is 2, and workspace\_id is XXXXXXXXXXXXXXXX, then the prefetch and initiation code would be:
```javascript JavaScript wrap theme={"theme":{"light":"github-light","dark":"github-dark"}}
```
**Warning**
Always update the version in the web personalisation cdn link whenever you change the version of Web SDK. Both this link and the Web SDK should have the exact same version every time for proper functioning of Web Personalisation.
## Test Environment
For data to be tracked in the test environment, include `debug_logs` in the src of the above script as follows:
```javascript JavaScript wrap theme={"theme":{"light":"github-light","dark":"github-dark"}}
```
For example, if the dashboard URL starts with [https://dashboard-01.moengage.com](https://dashboard-01.moengage.com), your current version of Web SDK is 2, and workspace\_id is XXXXXXXXXXXXXXXX, then the whole code will look like:
```javascript JavaScript wrap theme={"theme":{"light":"github-light","dark":"github-dark"}}
```
# Method 2: If you have passed the useLatest: true flag in NPM initialisation config
In this case, Add this script to initiate the web personalization module:
```javascript JavaScript wrap theme={"theme":{"light":"github-light","dark":"github-dark"}}
```
Change the following fields:
* Replace the 'workspace\_id' in the URL above with the Workspace ID in the MoEngage Dashboard settings. Navigate to Dashboard -> Settings -> App -> General and copy the Workspace ID.
* Replace 'DC' in the URL above with the data center your instance is hosted on. MoEngage hosts each customer in a different data center. Tracked data is stored in the default data center of MoEngage. To find your data center mapping, refer to Data Center Mapping. The possible value is dc\_X where 'X' is your data center number.
For example, if the dashboard URL starts with [https://dashboard-01.moengage.com](https://dashboard-01.moengage.com), and workspace\_id is XXXXXXXXXXXXXXXX, then the prefetch and initiation code would be:
```javascript JavaScript wrap theme={"theme":{"light":"github-light","dark":"github-dark"}}
```
# Cache Data Refresh
Web Personalization data will be fetched and stored in the browser cache. The data will be synced again on the Next Page Load only if it meets any of the below conditions:
* 15 minutes have passed since the last data fetch
* Login or Logout is executed
# Web Personalization Anti-Flicker Code
The Anti-Flicker snippet is a small piece of code that helps to maintain the user experience on your website when running a web personalisation experience. [Know more about Flicker](https://help.moengage.com/hc/en-us/articles/24406473752724-Flicker-Management)
Page flickering is a problem that only occurs with experiments on a web page in areas that are visible when the page initially loads. There are certain cases where page flickering may not be an issue, such as experiments occurring below the visible area or experiments that occur after a visitor performs a specific action, such as triggering a Recently Viewed or Added to Cart product grids. In such scenarios, generally, the anti-flicker code need not be added to the website.
## Steps To Install Anti-flicker Code
To prevent page-flickering, there are 2 options
1. Masking the content of the entire page until the personalization is complete **OR**
2. Masking individual elements that have been personalized using the WYSIWYG editor
**Note**
* Only one of approaches - [Option 1](/developer-guide/personalize-sdk/sdk-integration/web-personalization-v2#option-1-masking-content-of-the-entire-webpage) or [Option 2](/developer-guide/personalize-sdk/sdk-integration/web-personalization-v2#option-2-masking-individual-elements-on-the-webpage) - must be implemented on your website.
### Option 1: Masking content of the entire webpage
1. Add the below code as high on the page as possible, in the `` of your website code.
2. In the script below, **MAX\_RENDER\_TIME** refers to the wait time (in milliseconds) before the visitor is shown the original website in case the personalized experience fails to load. You can update this value based on your website performance needs.
```javascript JavaScript wrap theme={"theme":{"light":"github-light","dark":"github-dark"}}
```
### Option 2: Masking individual elements on the webpage
This method will only mask specific elements on the webpage that have been personalized. In the script below,
1. Add HTML selector of each personalized element on the webpage to the array **personalizedSelectors.** [How to find HTML selectors for personalized elements?](/developer-guide/personalize-sdk/sdk-integration/web-personalization-v2#option-1-use-the-element’s-html-id)
2. **maxRenderTime** refers to the wait time (in milliseconds) before the visitor is shown the original website in case the personalized experience fails to load. You can update this value based on your website performance needs.
3. Add the below code as high on the page as possible, in the `` section of your website code.
```javascript JavaScript wrap theme={"theme":{"light":"github-light","dark":"github-dark"}}
```
An example of multiple elements personalized on a webpage is shown below for reference.
```javascript JavaScript wrap theme={"theme":{"light":"github-light","dark":"github-dark"}}
const personalizedSelectors = ['#homepage-title', '#homepage-subtitle', '#homepage-cta', '#homepage-cta-link', '#homepage-banner'];
```
There are 2 ways to find the HTML selector that has been personalized.
#### Option 1: Use the element’s HTML ID
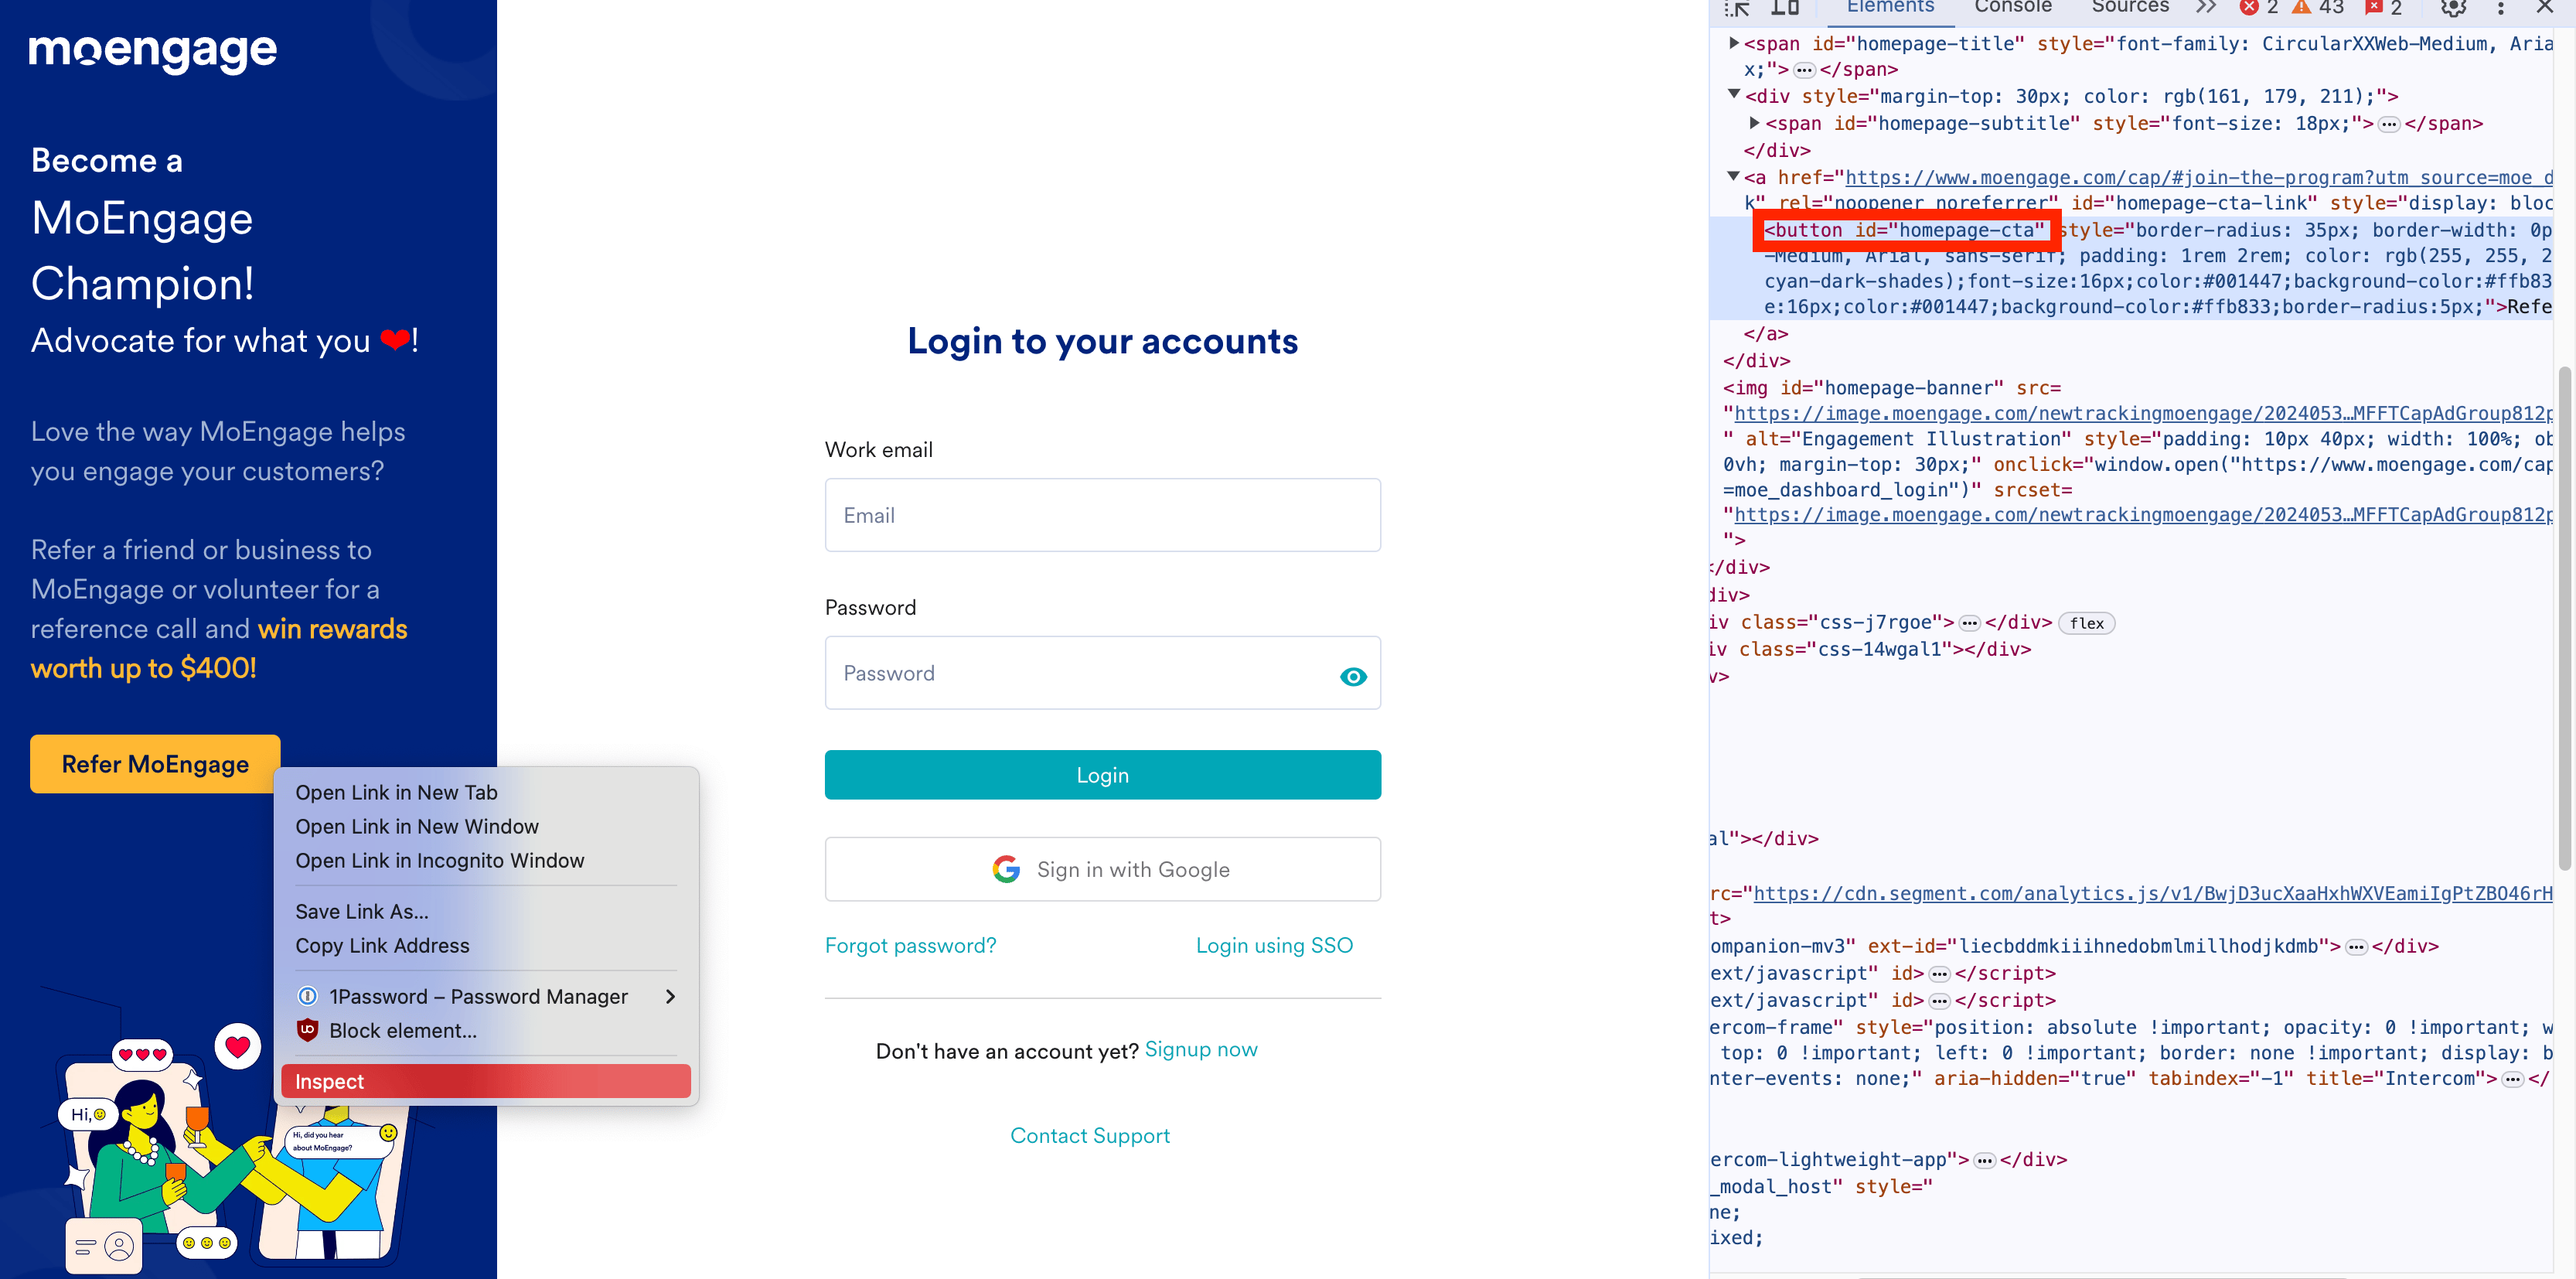
1. Right-click on the element.
2. Select **Inspect** or **Inspect Element** in the context menu.
3. In the highlighted HTML, find the HTML ID for that element. This is how the input would look like for the element highlighted in the image.
\
Below is the input to be given to the anti-flicker snippet for the HTML element in consideration.
```javascript JavaScript wrap theme={"theme":{"light":"github-light","dark":"github-dark"}}
const personalizedSelectors = ['#homepage-title'];
```
#### Option 2: Use the element’s HTML selector path
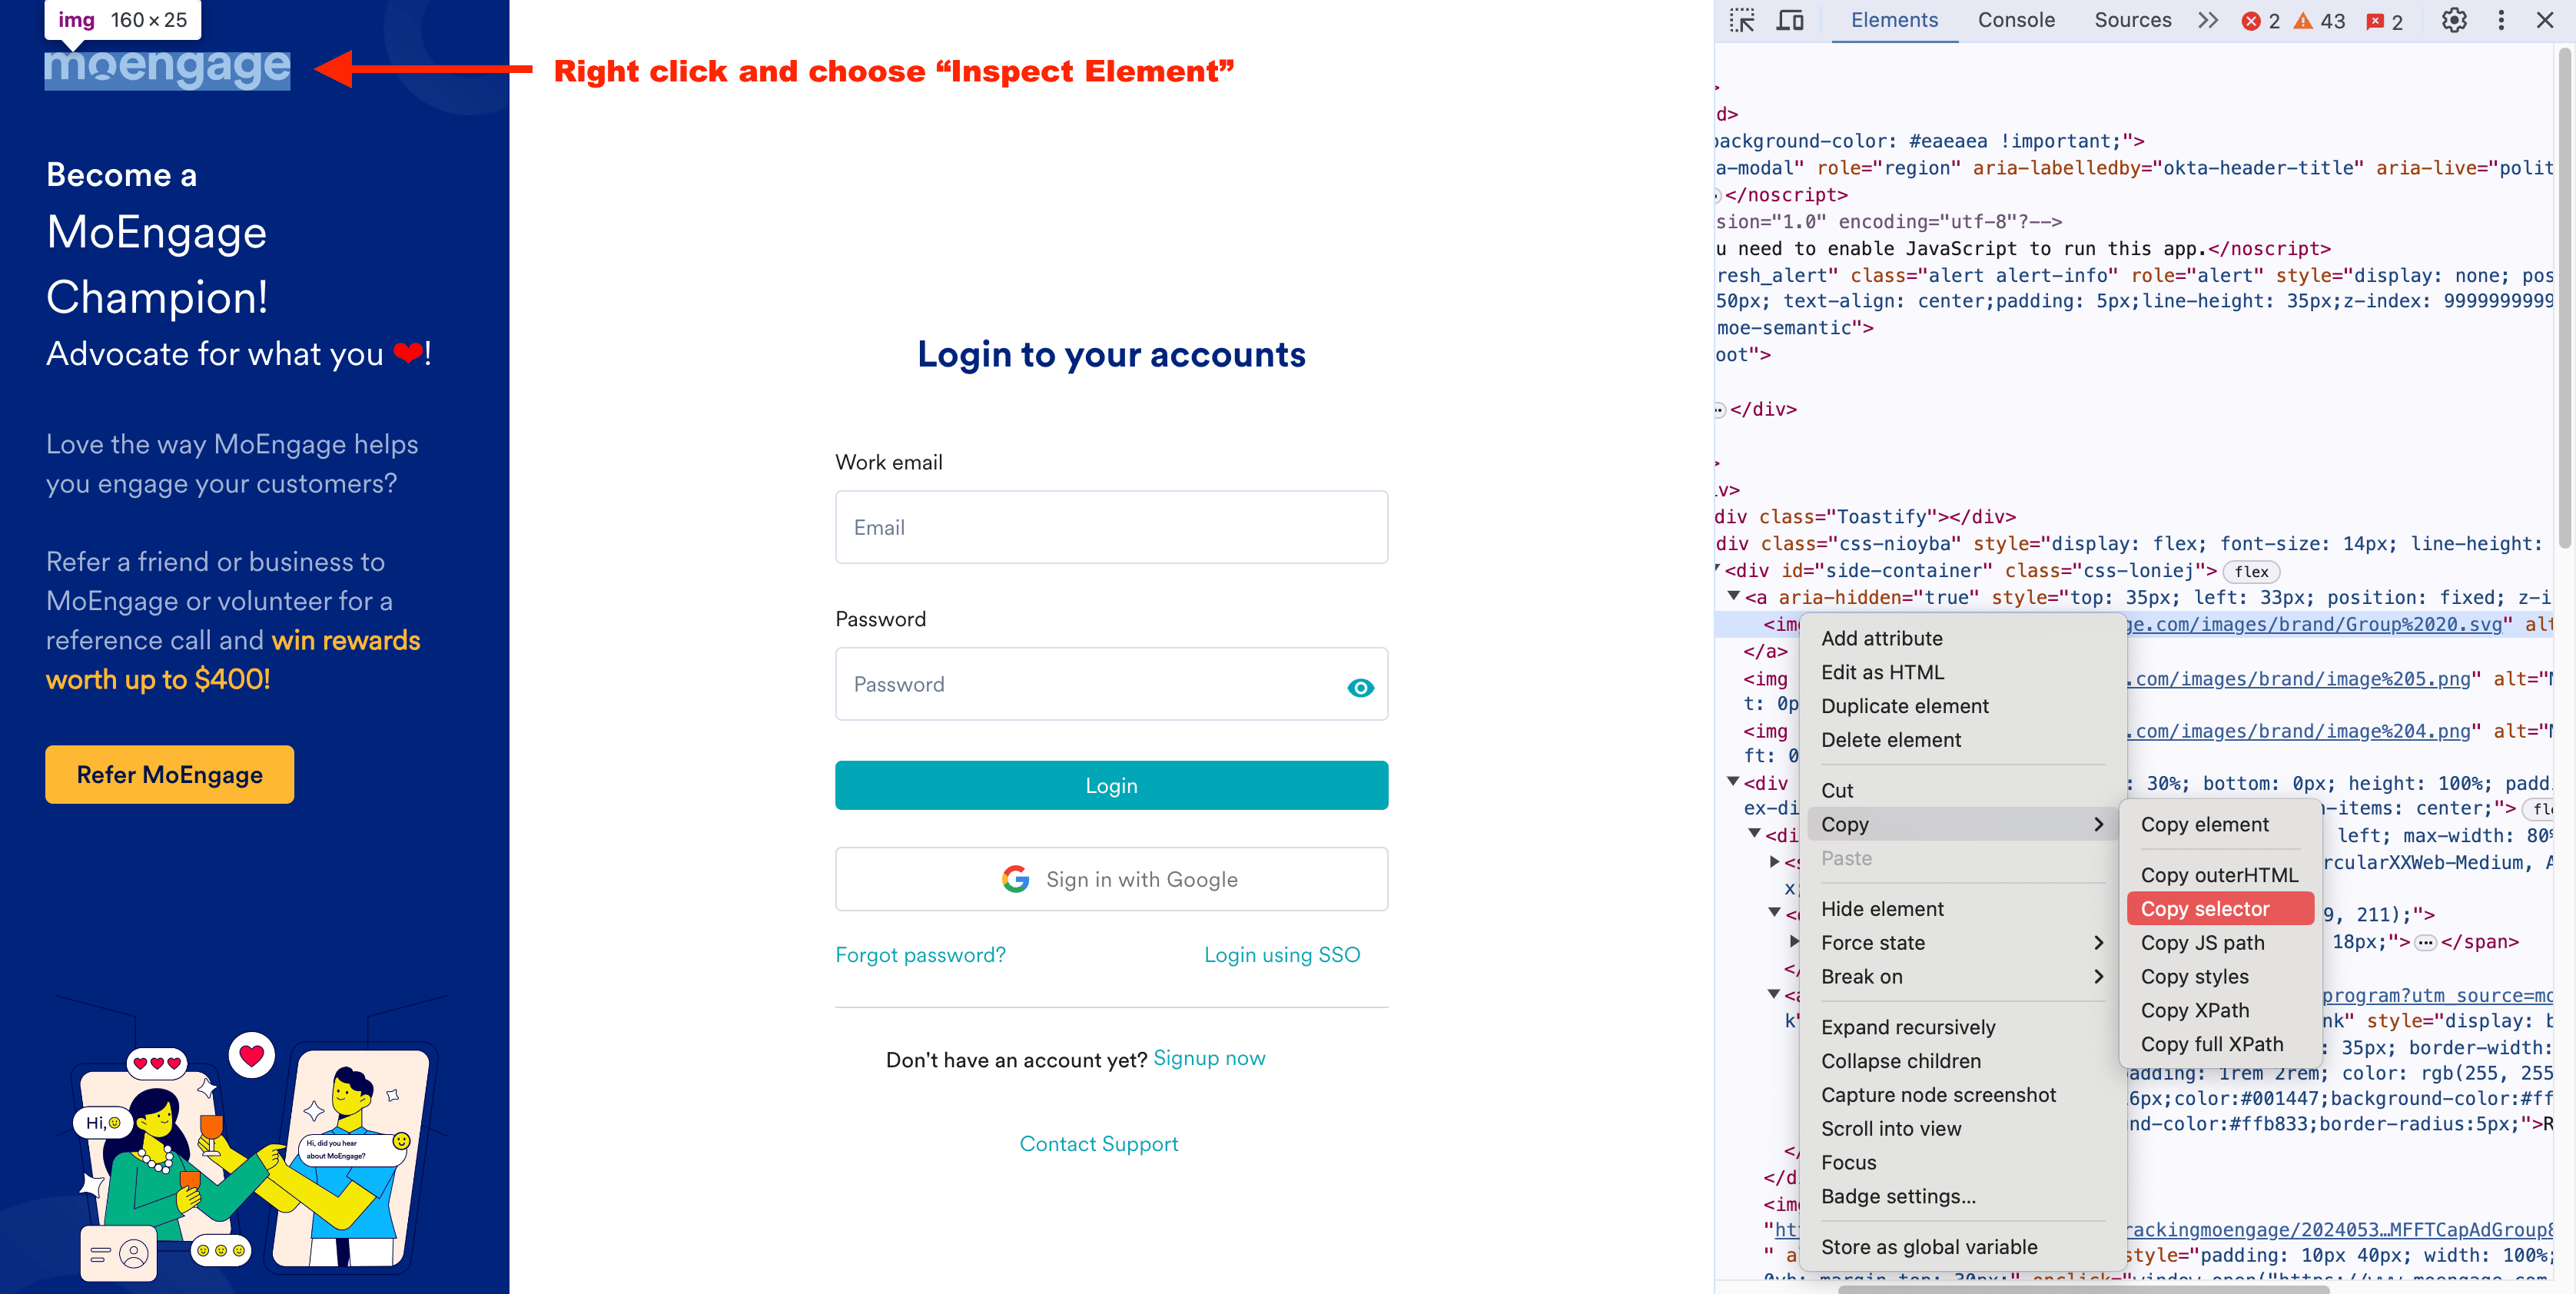
1. Right-click on the element.
2. Select **Inspect Element**in the context menu.
3. In the highlighted HTML, right click and choose **Copy Selector** in the context menu.
\
Below is the input to be given to the anti-flicker snippet for the HTML element in consideration
```javascript JavaScript wrap theme={"theme":{"light":"github-light","dark":"github-dark"}}
const personalizedSelectors = ['#side-container > a > img'];
```
 \
Below is the input to be given to the anti-flicker snippet for the HTML element in consideration.
\
Below is the input to be given to the anti-flicker snippet for the HTML element in consideration.
 \
Below is the input to be given to the anti-flicker snippet for the HTML element in consideration
\
Below is the input to be given to the anti-flicker snippet for the HTML element in consideration